


Last post I mapped out the six places Claude lives in 2026 and told you most people only need two of them. If Cowork ended up being one of your two, this is the setup.
This Claude Cowork setup guide walks you through everything you actually need.
Install the desktop app, scope a folder Claude’s allowed to touch, spin up your first Project so it remembers context between sessions, connect a tool or two (Gmail, Drive, Notion, whatever you live in), run one real task end-to-end, and turn that task into something that repeats on a schedule.
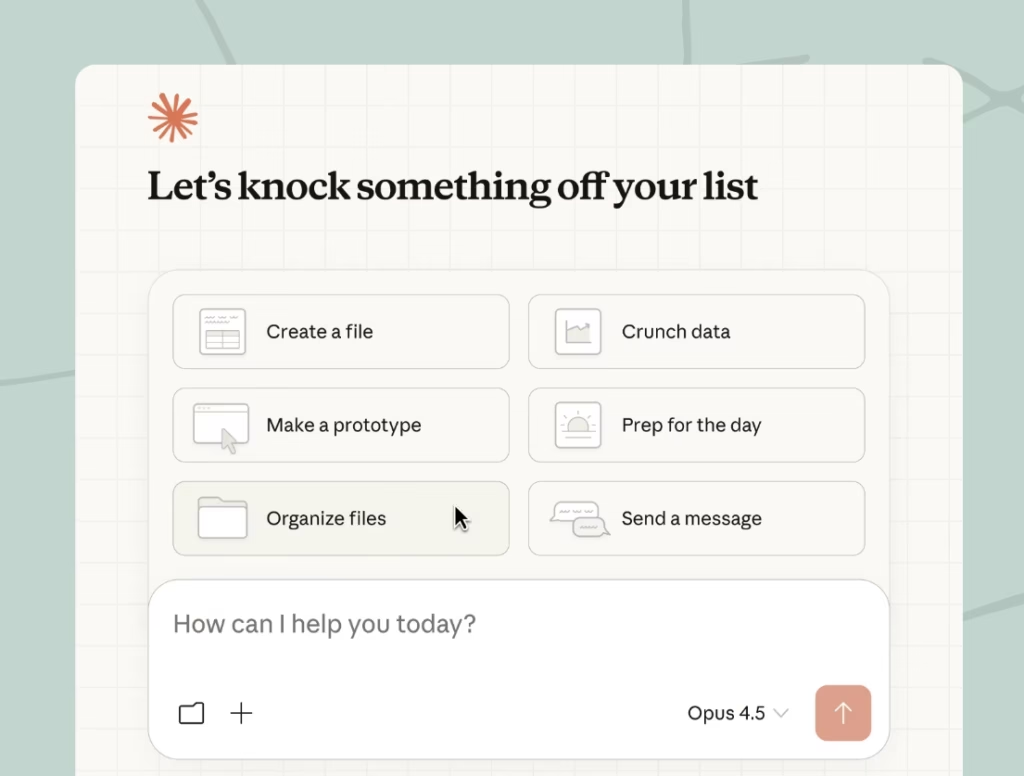
If you have the mobile app, we wire up Dispatch at the end so you can hand off work from your phone while you’re making coffee.
Cowork went generally available earlier this year. Anyone on a paid Claude plan has it already. You just haven’t switched it on.
Block out 45 minutes. That’s enough to get through this whole guide and have one workflow actually running before you close the laptop.
Before You Start
A paid Claude plan. Pro at $20/mo covers everything in this guide including computer use. If you’re not sure which plan fits your usage, here’s the full breakdown of Pro vs. Max vs. Free. If you’re still on Free, you’ll hit a wall on the first step.
The Claude desktop app for Mac or Windows. Cowork isn’t on the web and isn’t on mobile because the agent needs a machine to run on.
Grab the installer at claude.com/download if it’s not already sitting in your Applications folder.
A folder you’re okay with Claude reading and writing to. Pick something low-stakes for your first run. A client project directory, a side-project folder, your Downloads.
Something where the worst-case scenario is you re-download a couple of files. Not your entire home directory, and not anywhere you’ve got tax documents or credentials sitting loose. You can expand access later once you trust how it behaves.
About 2GB of free space. The first time you open Cowork, it pulls down the sandboxed VM it runs tasks inside. Takes a few minutes on a decent connection and then you never think about it again.
That’s the whole prerequisite list. Everything else gets set up inside the app.
Step 1: Install the Desktop App and Find Cowork
Open the installer. Sign in with the account tied to your Claude subscription. When the app opens, you’ll see tabs at the top left of the window including Chat, Cowork, and Code. Click Cowork.
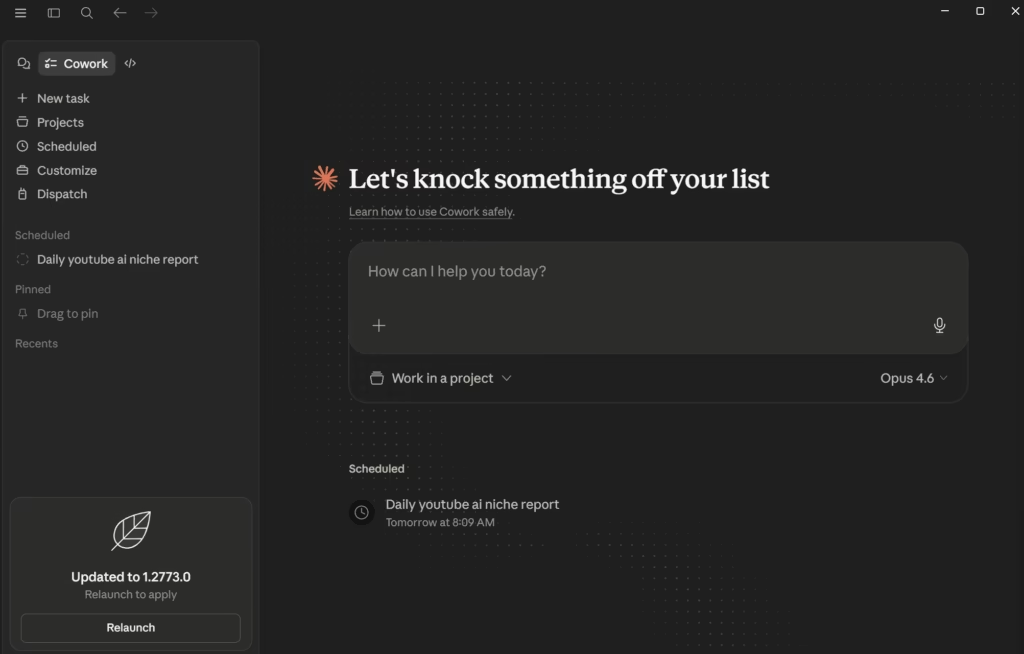
The first time you click it, the app downloads the sandboxed VM I mentioned earlier. You’ll see a progress bar. Go refill your coffee.
Once it loads, the left sidebar gives you the whole map of what’s in here:
- New task: start a fresh Cowork session
- Projects: your scoped workspaces (we set one up in Step 2)
- Scheduled: tasks that repeat automatically (Step 6)
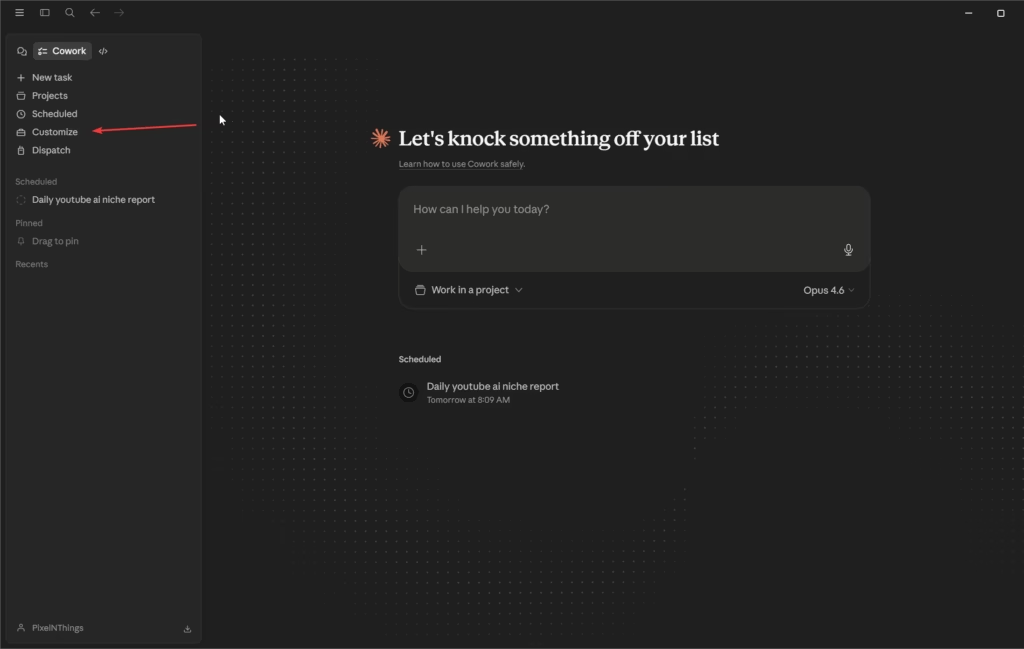
- Customize: Skills, connectors, and personal plugins (Step 4 and Step 6.5)
- Dispatch: control Cowork from your phone (Step 7)
If the Cowork tab doesn’t appear at all, it usually means one of two things. Either you’re signed into a Free account (Cowork is paid-only), or the app hasn’t caught up with a recent plan upgrade.
Sign out, sign back in, and it should show up.
What’s the difference between Claude Cowork and Claude Code?
Cowork and Claude Code use the same underlying agent engine, but they’re built for different work.
Claude Code is a developer tool that runs in your Claude Desktop app (along with Cowork), terminal or inside an IDE like Cursor. It reads codebases, writes code, runs tests.
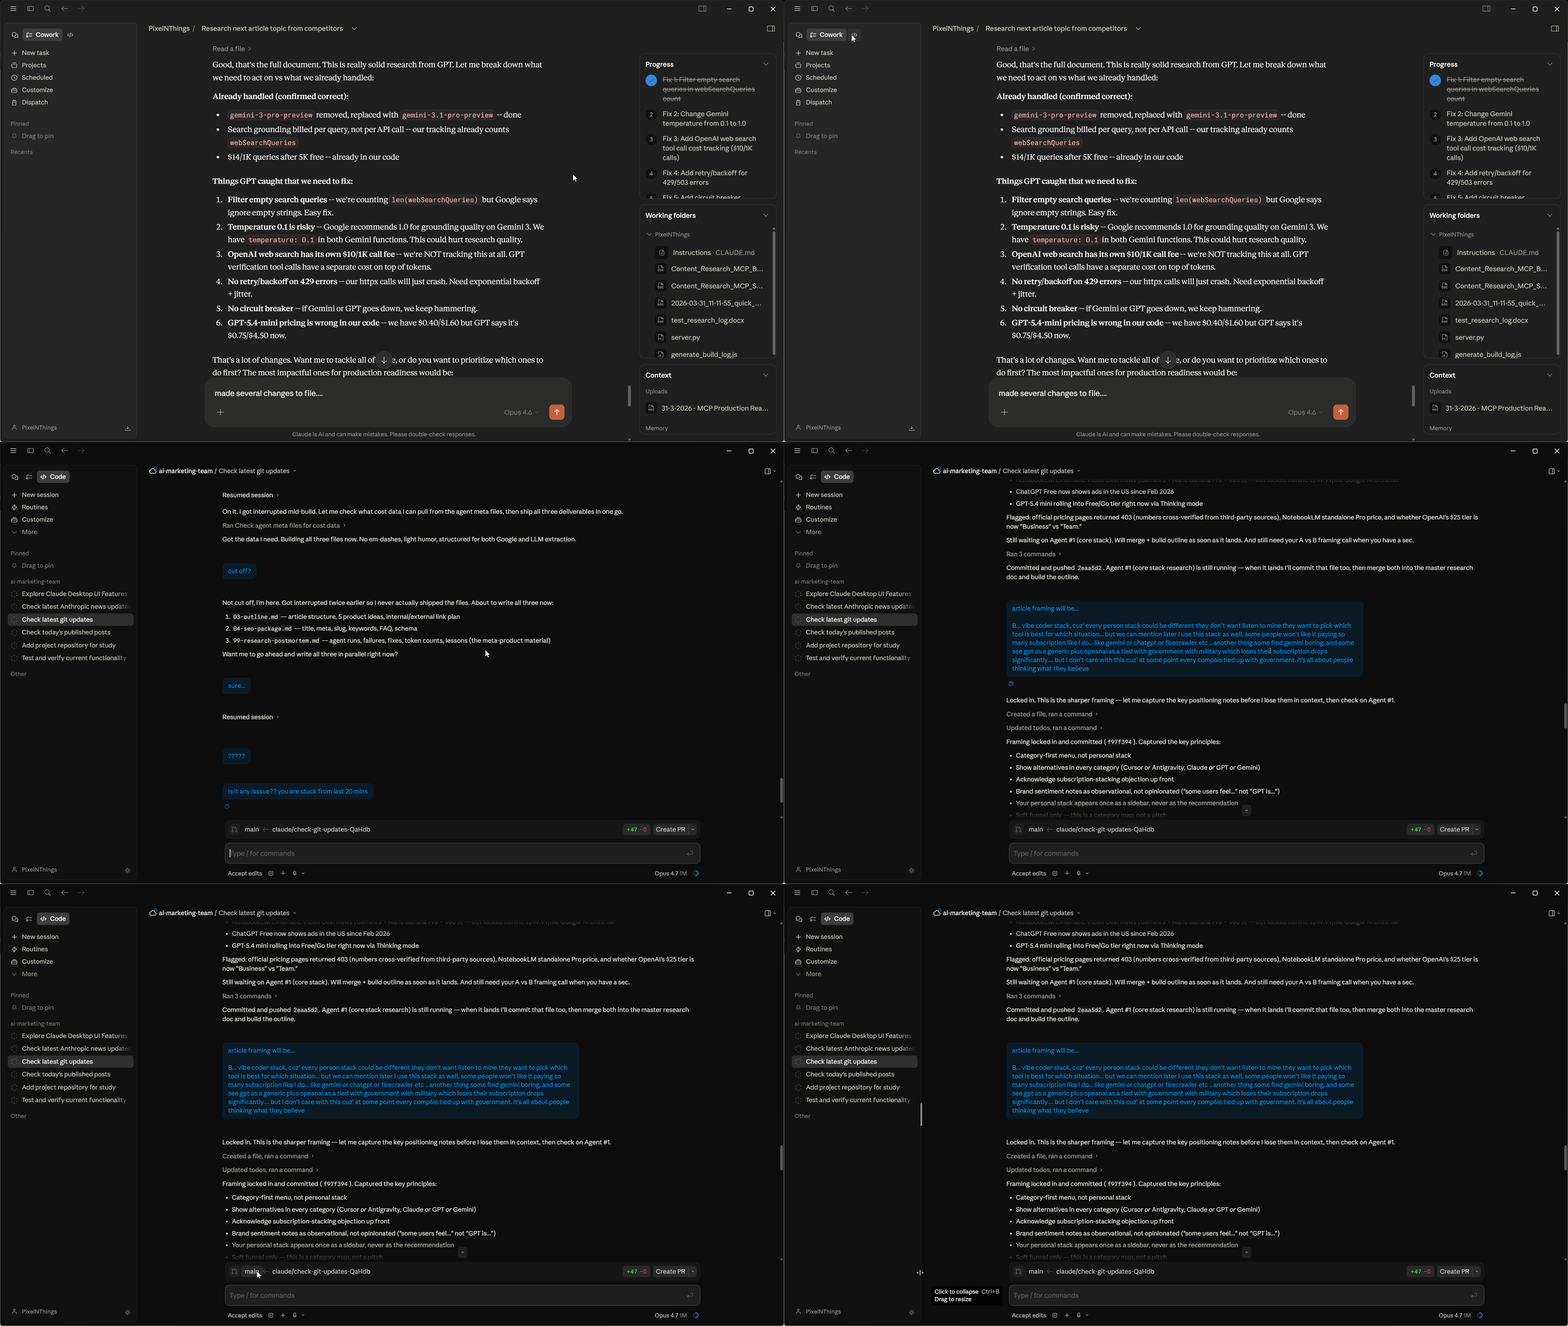
Cowork also lives inside the Claude desktop app with a chat-style interface. It’s built for knowledge work, organizing files, drafting documents, pulling reports, automating anything that isn’t code.
Rule of thumb: if your workflow involves a terminal, you want Claude Code. If it doesn’t, you want Cowork. More on this split in the overview post.
If your workflow is knowledge management (research notes, wikis, second brain), the Obsidian + Claude Code integration guide covers that setup.
Step 2: Create Your First Project
Projects are what separate people who get real value from Cowork from people who try it once and think it’s overhyped.
By default, every Cowork session starts from zero. No memory. No context. You re-explain who you are, what you’re working on, and what output you want every single time.
That’s why beginners think Cowork is generic. They’re prompting the same way they prompt Chat, and Cowork is forgetting everything between sessions.
Projects fix this. A Project is a scoped workspace that Claude pins context to – the folder you point it at, the instructions you give it, and the memory it builds up over time. Next session, Cowork opens that Project and already knows your setup.
How to create a Project
In the Cowork tab, click the Work in a project dropdown at the bottom of the input field. You’ll see recent folders, an option to choose a different one, and a Projects submenu.
Click Projects, then Create new project at the bottom of the list.
You’ll get three setup options:
- Start from scratch: New folder, new instructions, new files. Best for a fresh workflow.
- Import a project: Pull in a Project you’ve already set up in Chat. Good if you have context living there already.
- Use an existing folder: Point Cowork at a folder you already work from. Best for real work where the files already exist.
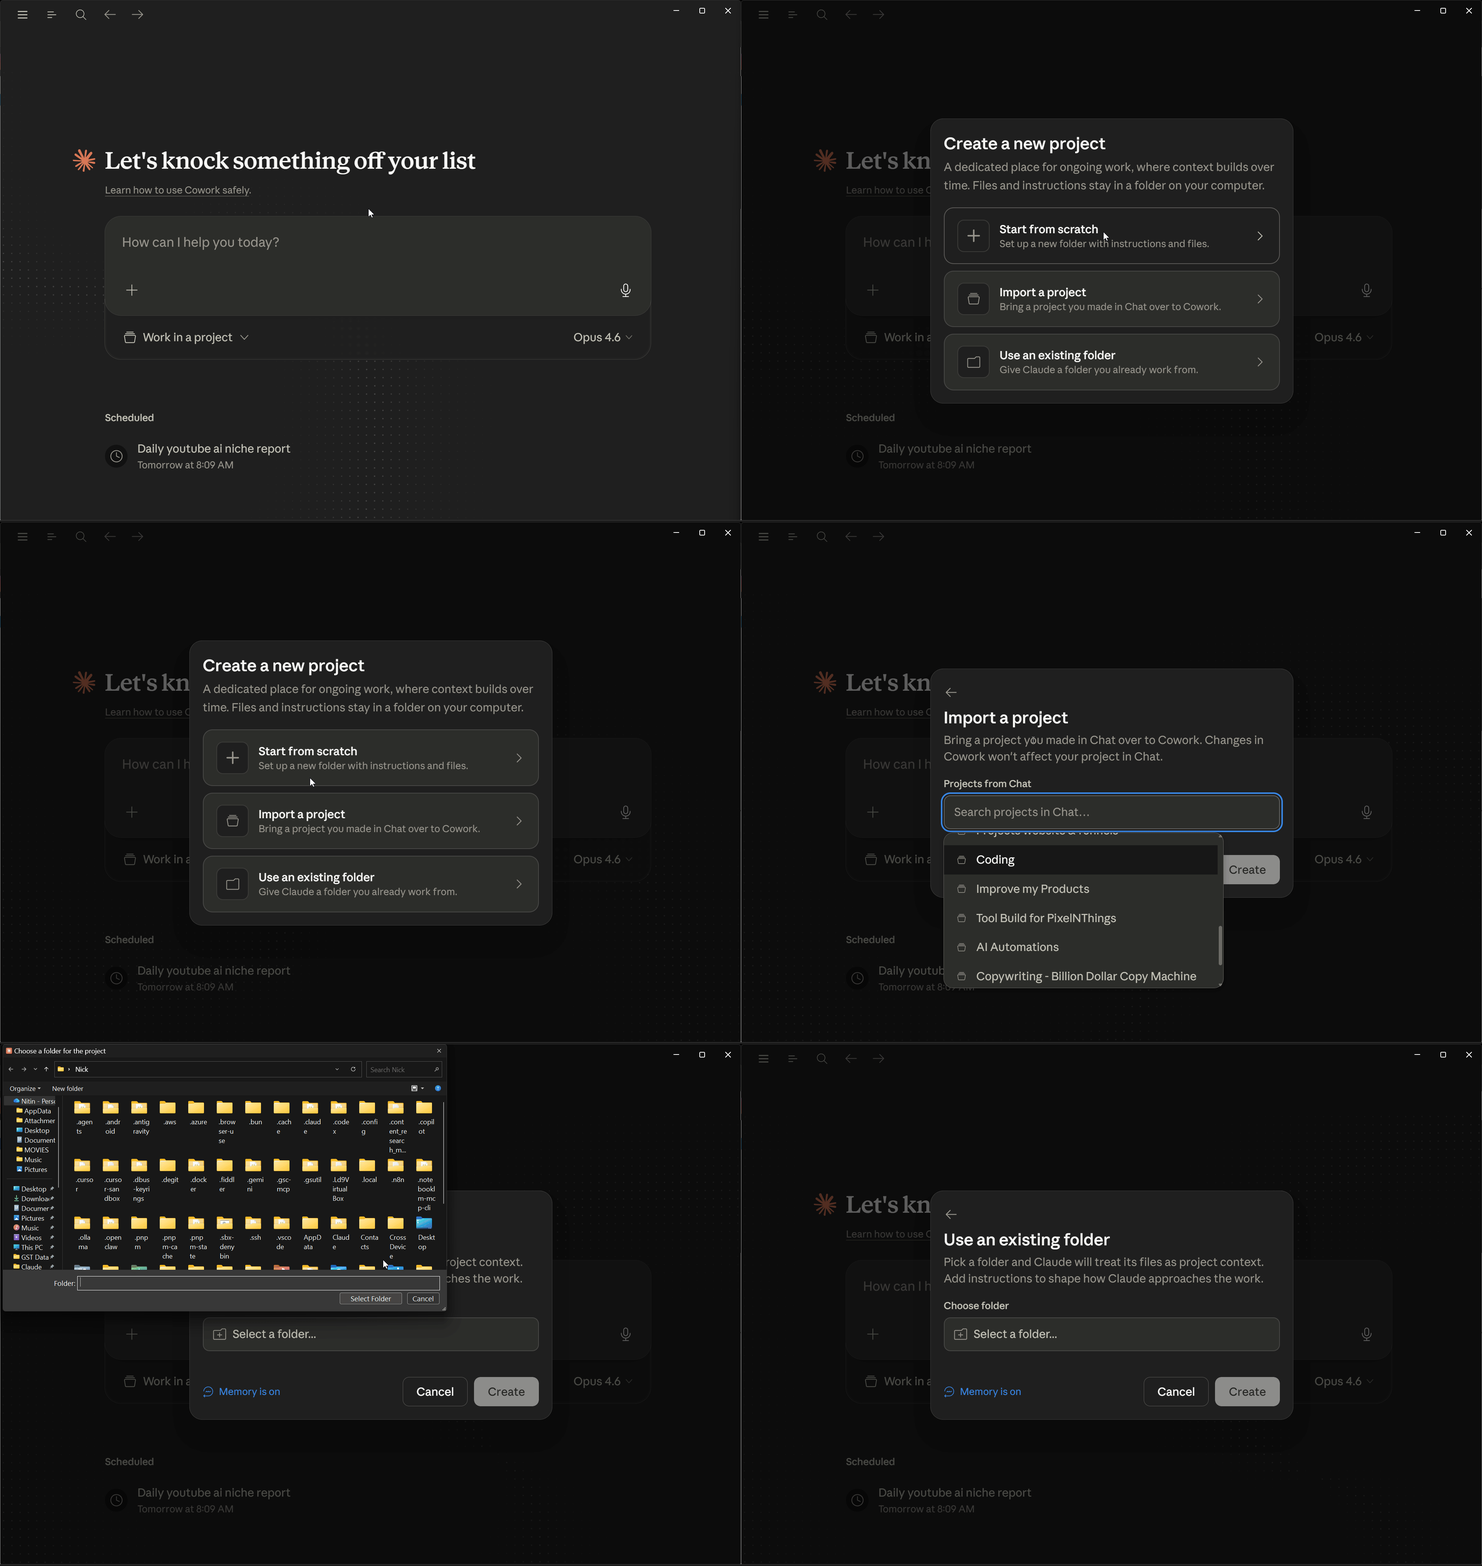
For your first Project, I’d start from scratch. Less chance of accidentally exposing something you didn’t mean to share.
Naming and instructions
Give it a name (something specific, “Client Prep” or “Content Pipeline” beats “Test” or “Project 1”). Then the Instructions field is where the real work happens.
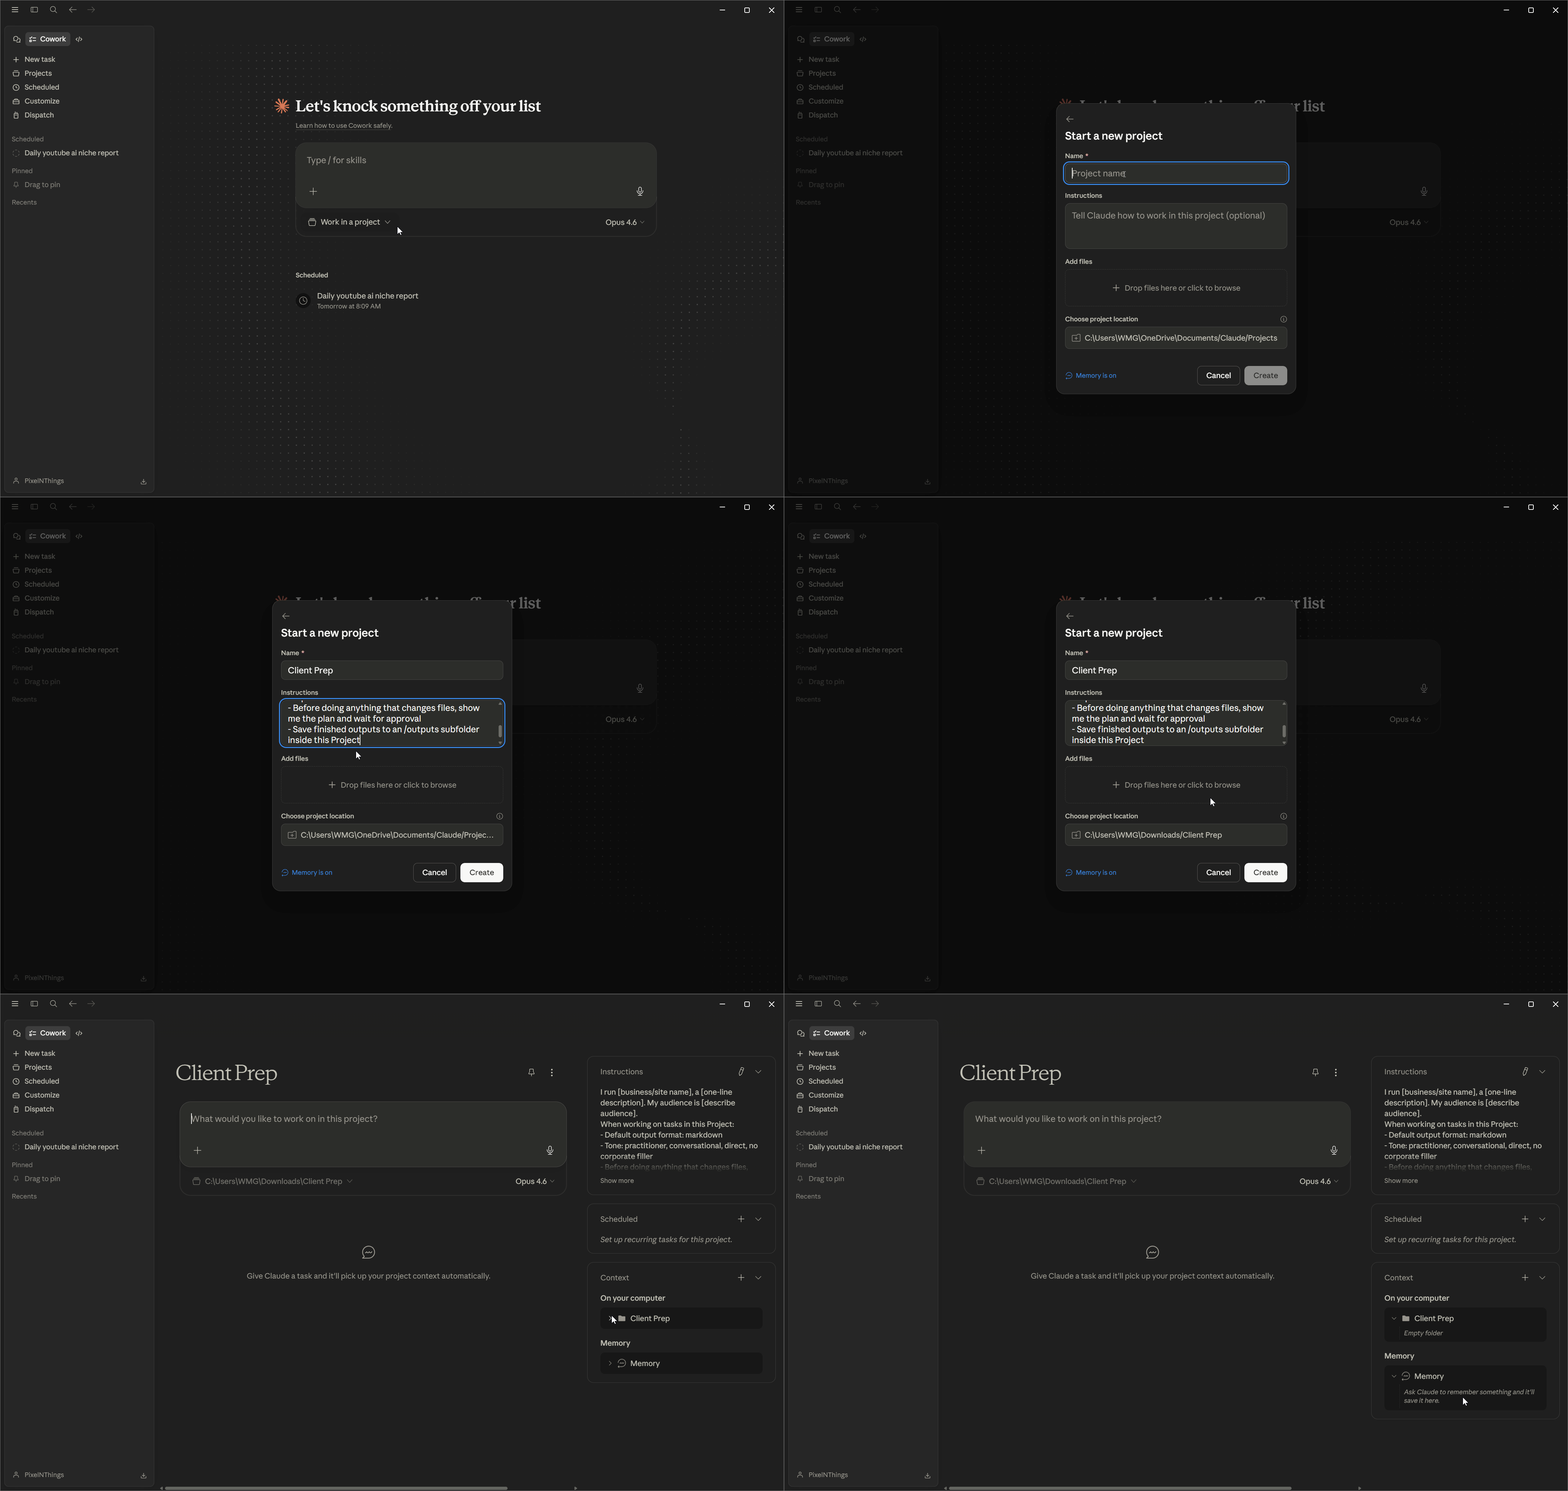
Instructions are the “here’s who I am, here’s what I do, here’s how I want output formatted” brief that loads at the start of every session in this Project. Cowork reads it automatically. You don’t have to re-paste it into every prompt.
A good starter template…
PROMPT
## Identity
I run [business/site name], a [one-line description].
My audience is [describe audience — skill level, what they care about].
My voice: [2-3 adjectives, e.g. direct, practitioner-level, no fluff].

## Behavior rules
- Before doing anything that creates, moves, or deletes files — show me the plan and wait.
- If a task is ambiguous, state your best interpretation and proceed. Don't ask 5 clarifying questions.
- If you're unsure about a fact, say so. Never present a guess as certainty.

## Output standards
- Default format: [markdown / PDF / docx]
- Structure: proper heading hierarchy (H1 > H2 > H3). No orphan headers.
- File naming: [kebab-case / topic-slug-date / your preference]
- Save finished outputs to /outputs/

## Quality & tone
- No filler words: unlock, leverage, streamline, game-changer, dive into, it's important to note.
- No generic intros ("In today's fast-paced world...") or conclusions ("In conclusion...").
- Every claim needs a source or a reason. Don't assert — show.
- Match my expertise level. Don't over-explain things I already know.
Adjust to fit your own work. Thirty seconds of setup here saves fifteen minutes of re-prompting every session after that.
Templates by use case
The starter template above works for anyone. These are tighter versions for specific workflows.
Solopreneur / agency owner
PROMPT
## Identity
I run a digital agency serving local businesses. My services: websites, funnels, automations (GoHighLevel + n8n).
My clients are non-technical business owners — plumbers, dentists, realtors. They need clear, no-jargon communication.

## Behavior rules
- Before sending anything externally (email, Slack, calendar invite) — show me the draft and wait.
- Never include internal pricing, margins, vendor costs, or tool names (n8n, GHL) in client-facing docs. Clients see outcomes, not the stack.
- If a task involves multiple clients, confirm which client before starting.
- When I give you a client name, use it consistently in file paths and doc headers.

## Output standards
- Default format: markdown or PDF, structured for client delivery
- Save client-facing outputs to /outputs/[client-name]/
- Internal docs (SOPs, notes, templates) go to /internal/
- File naming: [client-name]-[deliverable]-[date] (e.g. smith-plumbing-proposal-2025-06)

## Quality & tone
- Client-facing tone: professional, warm, clear enough that a plumber reads it once and gets it. No "synergy." No "leverage."
- Internal tone: direct, shorthand is fine, skip the pleasantries.
- Proposals and deliverables should look finished — proper headings, no placeholder text, no "insert X here" unless I ask for a template.
Content creator / solo operator
PROMPT
## Identity
I publish content on [site name] about [topics]. My audience is [describe audience — skill level, what they're trying to do].
I write from experience, not theory. Practitioner voice, peer-to-peer. If I haven't done it, I say so.

## Behavior rules
- Before modifying any published or in-progress draft — show me the diff and wait.
- New drafts are fair game. Edit freely, just don't overwrite existing work without asking.
- If I ask you to research something, search first. Never pad a section with training-data guesses when a live source exists.
- When a claim has a source, cite it inline as [source: URL]. When it doesn't, flag it as [needs source].

## Output standards
- Default format: markdown with proper H1 > H2 > H3 hierarchy. No skipping levels.
- Save drafts to /drafts/[topic-slug]/
- Save research notes to /research/[topic-slug]/
- File naming: [topic-slug]-[version] (e.g. claude-hooks-guide-v2)

## Quality & tone
- Banned words: unlock, leverage, streamline, game-changer, dive into, it's worth noting, in today's landscape.
- No generic intros or throat-clearing. First sentence should teach, provoke, or set up the problem.
- No summary conclusions that repeat the article back. End with a next step, an opinion, or nothing.
- Match my depth. If the topic is technical, write for practitioners. Don't water it down "for accessibility" unless I ask.
- Every section should pass the "would I actually publish this?" test. If it reads like AI filler, rewrite it.
Developer daily driver
PROMPT
## Identity
I'm a [frontend/backend/fullstack] developer working on [project/stack description].
My stack: [e.g. React, Next.js, Node, Supabase — list what's relevant].
Experience level: [e.g. senior, mid-level, learning X]. Don't over-explain what I already know.

## Behavior rules
- Before running destructive commands (delete, overwrite, drop, force-push) — show me what will happen and wait.
- Never commit directly to main. Suggest a branch name first.
- If I paste code without context, assume I want you to review it. Don't rewrite it unless I ask.
- When I say "fix this" I mean fix the specific problem. Don't refactor the whole file.

## Output standards
- Default format: markdown for docs, fenced code blocks with language tags for code.
- Code snippets: include the file path as a comment on line 1 (e.g. // src/components/Header.tsx).
- Save documentation to /docs/
- Save architectural decisions to /docs/decisions/ with format: [date]-[decision-slug].md
- Save scratch/throwaway code to /sandbox/ — never to the project root.

## Code review priority
When reviewing code, flag issues in this order:
1. Security (auth, injection, exposure, secrets)
2. Bugs (logic errors, race conditions, unhandled edge cases)
3. Performance (unnecessary re-renders, N+1 queries, bundle size)
4. Readability and style (last — don't bikeshed naming when there's a bug)

## Quality & tone
- No boilerplate explanations of what a function does if the name already says it. Comment the "why," not the "what."
- If there are multiple valid approaches, name them with tradeoffs. Don't just pick one silently.
- If a dependency or API has changed since your training data, say so instead of guessing the syntax.
- Don't add libraries to solve something the existing stack already handles.
Pick the one closest to your work, paste it into your Project instructions, swap the brackets. You’ll adjust it over the first few sessions as you learn what Claude gets wrong.
Create a test folder first. Before you point Cowork at anything real, spin up a Cowork-Test folder with fake files in it. Use that as your Project folder while you’re dialing in prompts. Once a prompt works reliably, promote the task to your real Project folder.
It’s the difference between learning in a sandbox and learning on live work.
Give Claude Cowork access to folders
Cowork can only read, write, or modify files inside folders you explicitly grant access to. When you create a Project and pick a folder, Claude gets permission to that folder and its subfolders only.
Everything else on your computer stays invisible unless you specifically ask it to. You can add or remove folders later under the Project settings.
One thing worth knowing if your Project folder has a lot of files… Cowork doesn’t scan everything upfront when a session starts. It works on demand.
When you give it a task, it looks at what’s relevant for that task, lists the directory, reads the specific files it needs, and works from there. If you ask it to “organize this whole folder,” it’ll do a broader scan, but methodically, structure first, then specific files as needed.
It’s not loading hundreds of documents into memory the moment you open a session. That said, very large folders still slow things down because the directory listing itself costs tokens.
Scoped Project folders still win over pointing it at your entire Documents directory.
Step 3: Set Your Global Instructions
Project instructions apply to one Project. Global Instructions apply to every Cowork session you run, across all Projects. This is where you put the rules you want Claude following no matter what you’re working on.
Where to find them
In the Claude desktop app, go to Settings → Cowork → Global Instructions and click Edit.
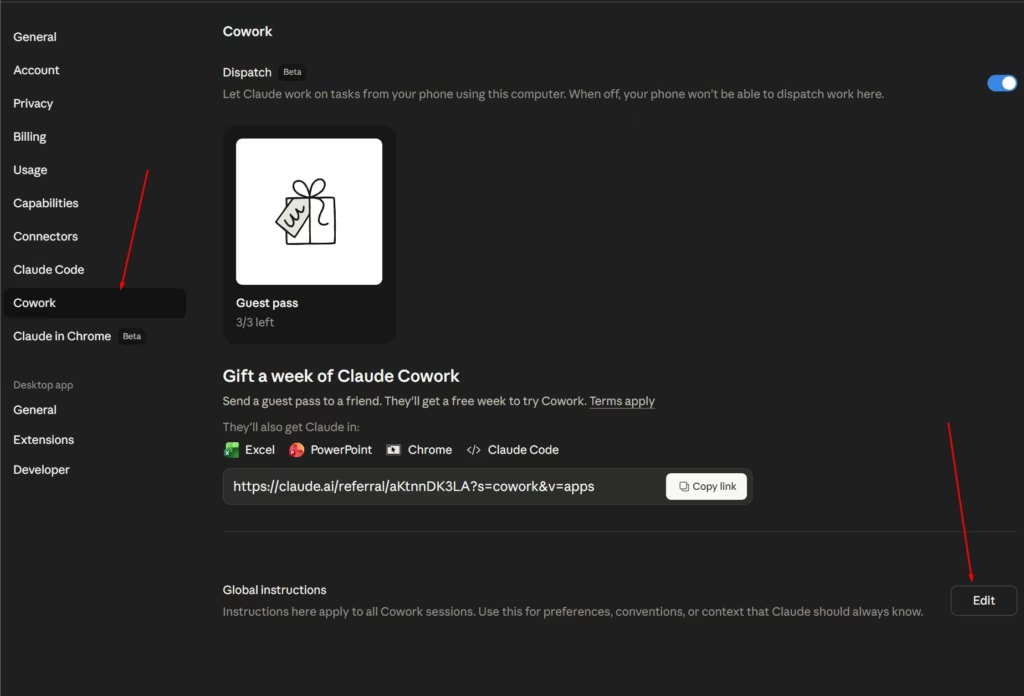
What to put in them
Think of Global Instructions as the behavioral baseline you want Claude operating from, tone, output preferences, and guardrails that don’t change between projects.
PROMPT
Tone & Voice
- Conversational, practitioner voice. No corporate filler.
- Banned words: unlock, leverage, streamline, seamless, robust, cutting-edge, game-changer
- Banned phrases: "here's the thing," "it's worth noting," "at the end of the day"

Output preferences
- Default format: markdown
- Use proper headings (H1, H2, H3), not bolded lines
- Include specific numbers and examples where possible

Working style
- Always show me the plan before making changes to files
- For destructive actions (delete, overwrite, move), wait for explicit approval
- If a prompt is ambiguous, ask one clarifying question instead of guessing
The pattern: “your voice rules + your output rules + your safety rules.” Short, specific, and written like you’d write a team onboarding doc.
This is also where practitioner credibility pays off. If you’ve got a style guide, a ban list, or a brand voice doc, paste the short version here. Every session after that, Claude defaults to your rules.
Step 4: Connect Your First Tool
Cowork can read your local files out of the box, but the real leverage comes from connecting the apps your work actually lives in: Gmail, Google Drive, Calendar, Notion, Slack, Canva, Figma, whatever.
Those connections happen through Connectors.
What’s a connector, really?
A connector is a bridge between Cowork and an external app. Under the hood it uses the Model Context Protocol (MCP), an open standard Anthropic created so AI agents can talk to third-party tools without anyone writing custom integration code.
One thing worth knowing: MCP works everywhere Claude runs. Connect Notion here, it shows up in claude.ai chat, Cowork, and Claude Code. One auth, all three surfaces.
Where to find Connectors
Click Customize in the left sidebar of Cowork.
Then click Connectors.
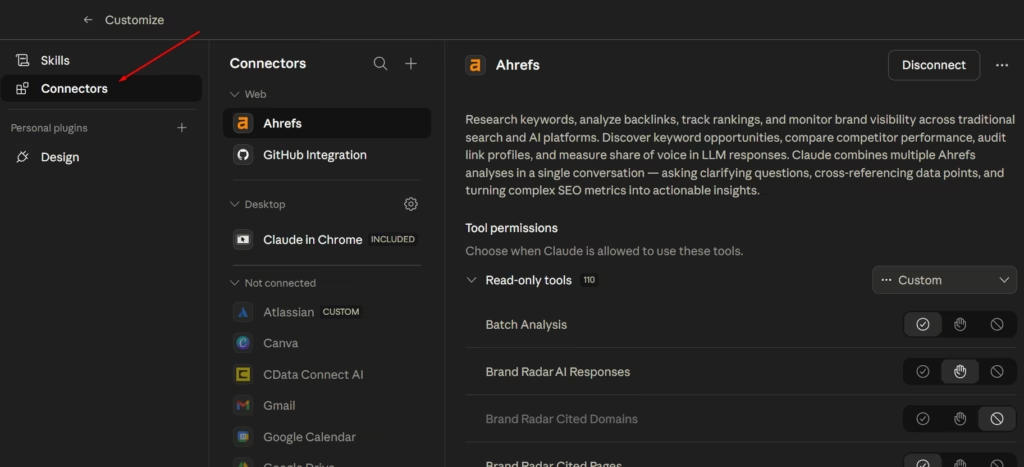
Three categories:
- Web: remote connectors. They run on Anthropic’s cloud and work across every Claude surface (web, Cowork, Desktop, mobile, Claude Code). Most connectors are this type. Gmail, Slack, Notion, Ahrefs, GitHub etc.
- Desktop: desktop extensions. They run locally on your machine and only work in Claude Desktop and Claude Code. Useful when the tool needs filesystem or local process access. Claude in Chrome lives here (included with Cowork).
- Not connected: available connectors you haven’t set up yet. Click one to add it.
Adding a connector
Click the + icon top-right. Two options:
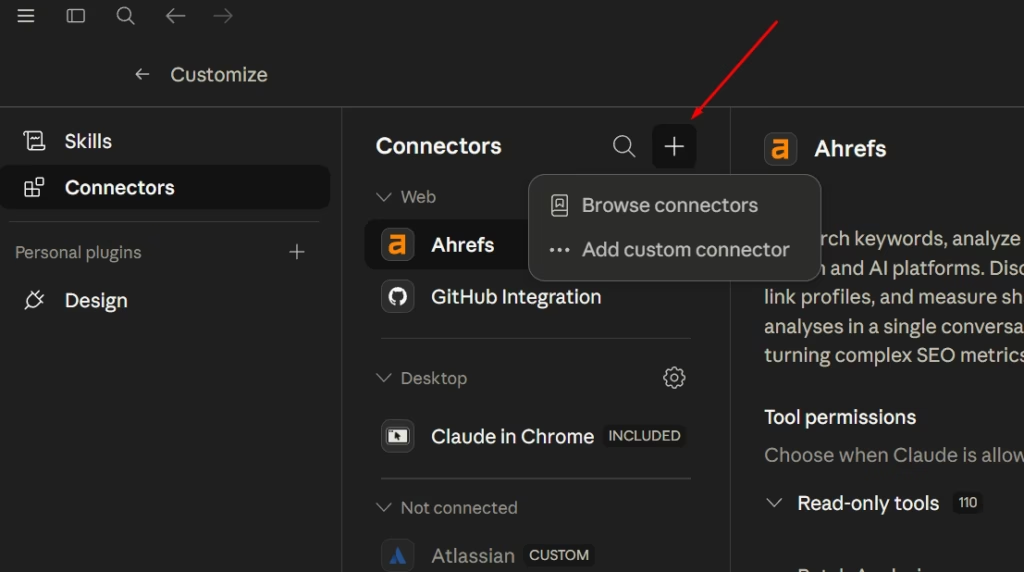
Browse connectors opens the Directory. Add custom connector lets you plug in any MCP server not in the directory yet.
Browsing the Directory
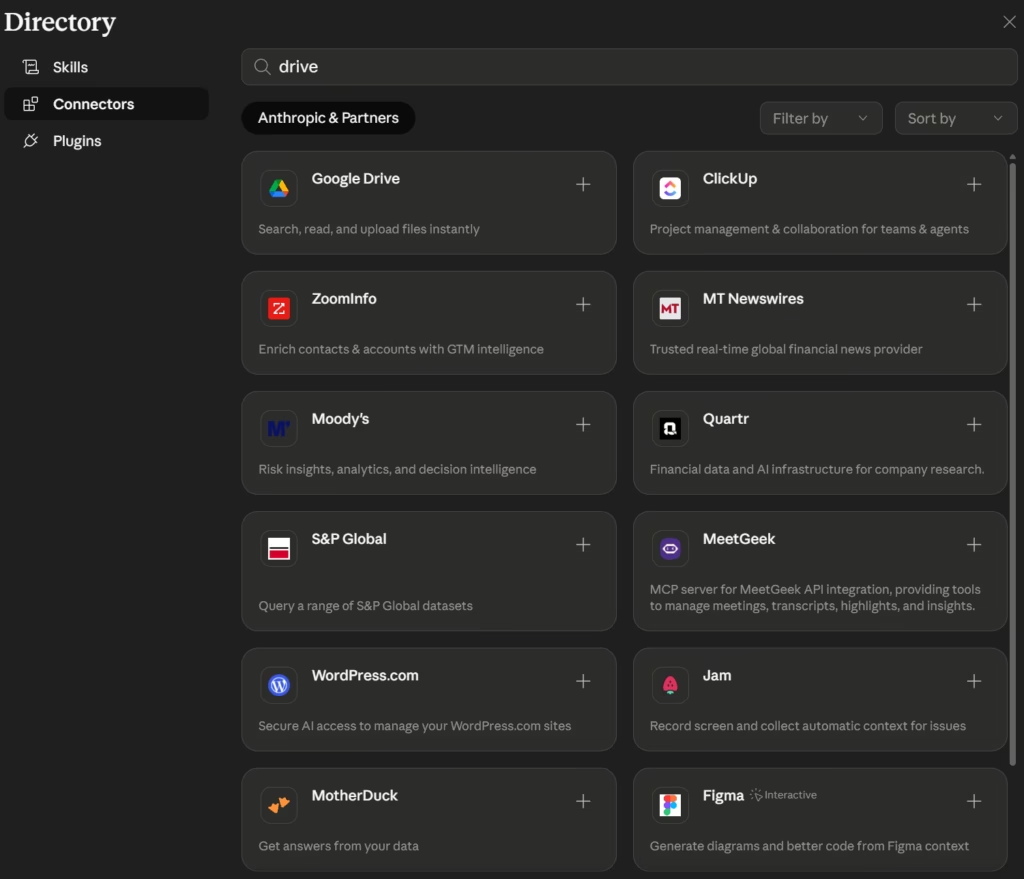
Search at the top, filter by type or category (Design, Communication, Data, Code, business-productivity, and more). Click the + on any card to add it. OAuth flow opens in a new window.
On the OAuth screen, don’t click through blind. Google/Slack/whoever will show you exactly what scopes Cowork is asking for.
If you only need read access, grant only read. You can always expand later. This is the step where most people over-permission and regret it.
Connect Gmail to Claude Cowork
In Cowork, open Customize → Connectors → click the + → Browse connectors. Find Gmail, click + on its card, sign into Google and review the scopes before approving.
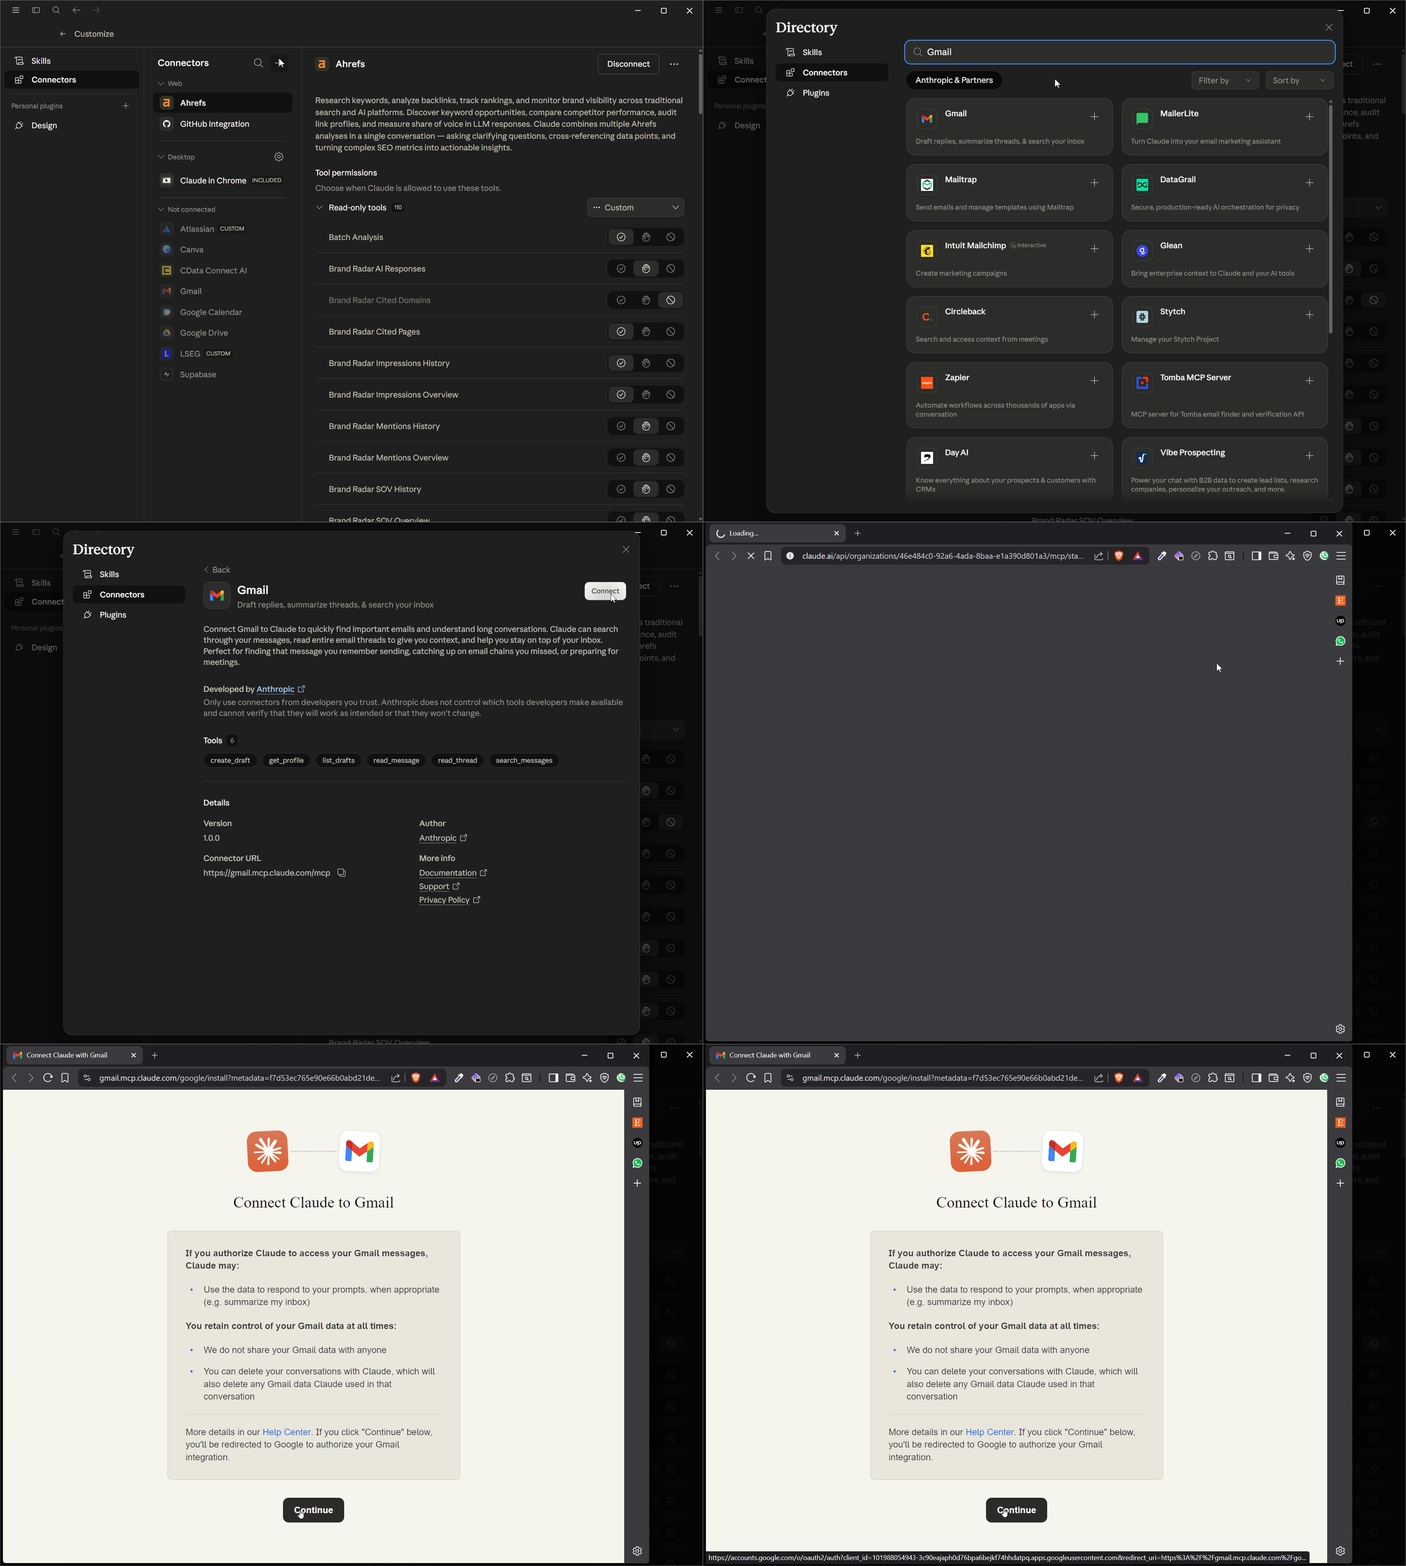
Grant only what matches your workflow. Gmail moves to your connected list once authorized.
Adding a custom MCP connector
This is where the real leverage is if you’re running non-standard tools. Most SaaS products ship their own MCP servers now – GoHighLevel, Firecrawl, YouTube (community one), or your own internal tools. If there’s an MCP endpoint, you can connect it.
Click the + icon → Add custom connector:
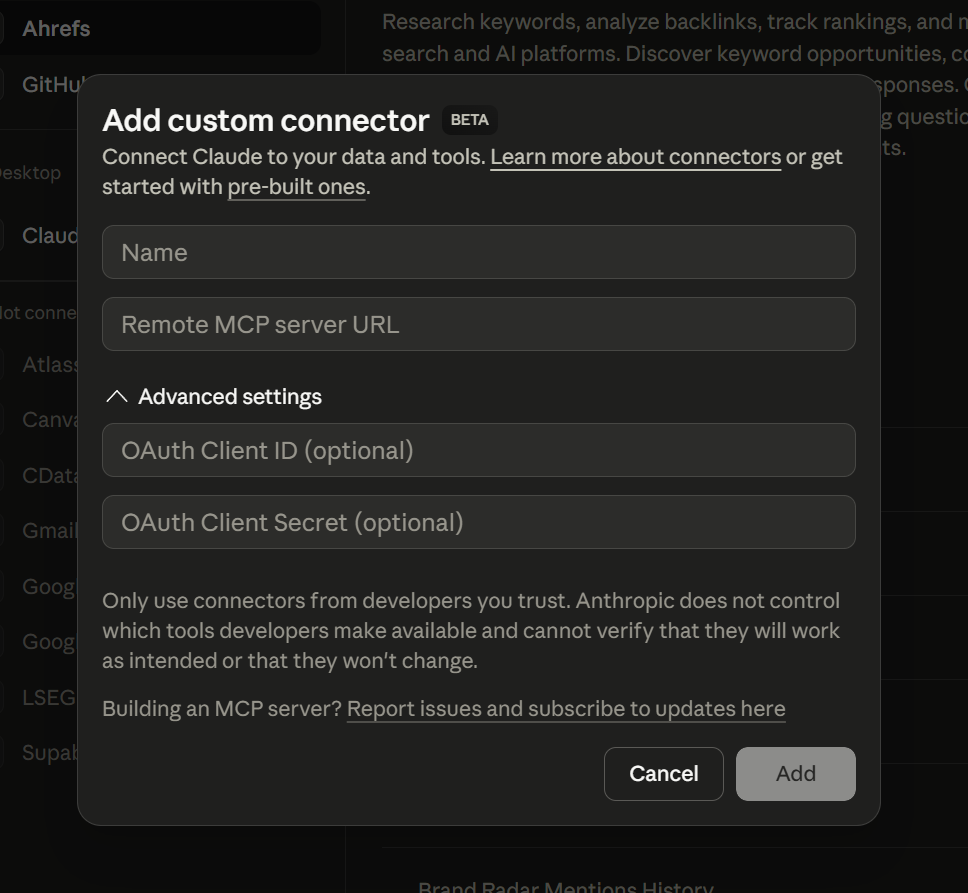
Paste the URL the vendor gave you, name it, authenticate if needed, hit Add.
One warning Anthropic flags: only use connectors from developers you trust. A custom MCP server has whatever tools the developer wired in, and Anthropic can’t verify what they do. Random GitHub-published server? Read the source first.
Tool permissions: the setting that matters most
Look at the Ahrefs screenshot again. That Tool permissions section with checkmark / hand / circle-slash icons next to each tool is where you decide what Claude can actually do with every connector.
You set it per tool, or for the whole connector at once using the dropdown at the top:
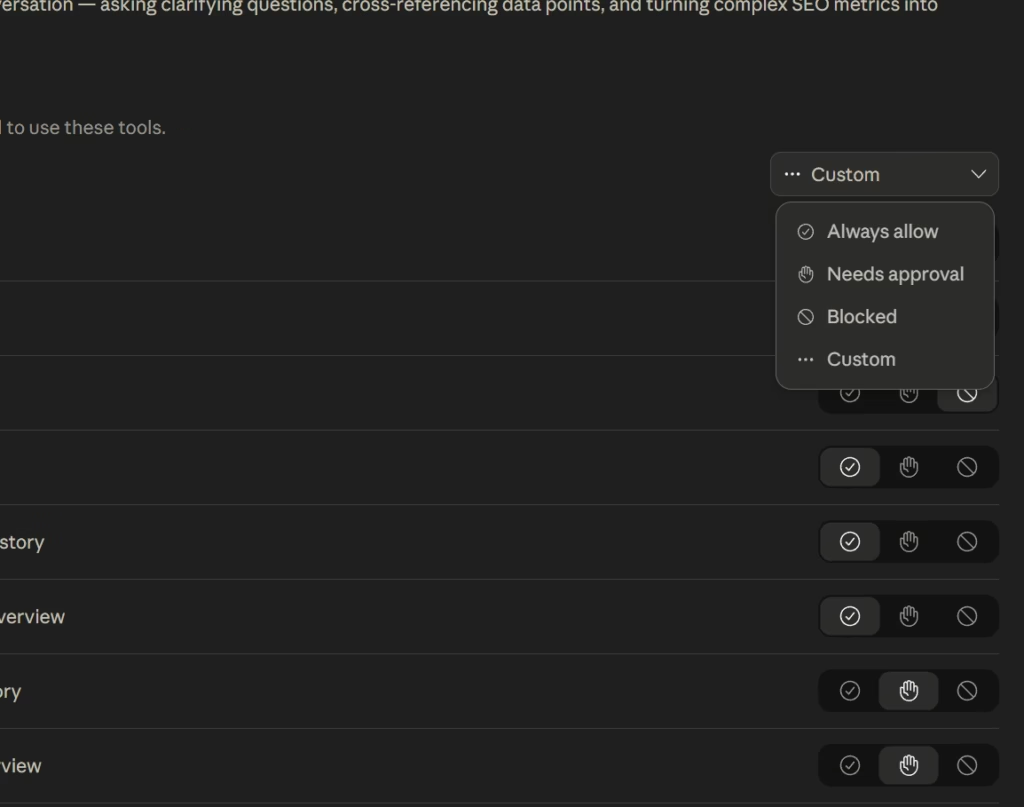
Three states:
- ✓ Always allow: Claude uses the tool without asking. Fast.
- ✋ Needs approval: Claude pauses and asks before each use. Safe.
- ⊘ Blocked: Claude can’t use the tool at all.
Custom is the mixed state, some tools on Always allow, others on Needs approval, others Blocked.
How I configure new connectors
My default pattern:
- Always allow for most tools: lets Claude move fast without me babysitting every call
- Needs approval: for anything sensitive sending emails, deleting files, posting publicly, modifying production data
- Blocked: for tools I’ll never want used, narrows the attack surface if something goes weird
The logic is, approval fatigue is real. If Cowork pauses on every read operation, you stop paying attention and start auto-clicking approve. That defeats the whole point.
Reserve Needs approval for actions where a mistake would actually cost you.
Connectors worth starting with
| Category | Connectors | What they’re good for |
|---|---|---|
| Email & calendar | Gmail, Google Calendar | Inbox triage, meeting prep, scheduling |
| Files & docs | Google Drive, Notion, Dropbox, Box | Pulling source material, saving outputs |
| Communication | Slack, Microsoft Teams | Channel summaries, thread context |
| Design | Canva, Figma, Lucid | Pulling assets, editing designs, diagrams |
| Analytics & SEO | Ahrefs, Custom MCP (Google Search Console, GA4) | SEO pulls, content performance |
| Dev & ops | GitHub, Supabase, Vercel, Atlassian Rovo, Linear | Code context, database and hosting management, ticket summaries |
| Meetings | Zoom for Claude, Circleback | Transcripts, recaps, action items |
| CRM & sales | GoHighLevel, HubSpot, Zoho, Clay, Outreach | Automation, Lead data, outreach automation |
Start with two or three that match where your work lives. Add custom MCPs as you need them.
Step 5: Run Your First Real Task
Time to put it to work. The task I’m walking through: client call prep.
Your Monday morning problem: you’ve got a client call at 3pm, and there’s a folder with their intake form, the proposal you sent, notes from the last call, and two docs they shared that you haven’t read yet. Forty-five minutes of reading before the call, or you walk in cold.
This is what Cowork is for.
Set up the folder
Inside your Project folder, create a subfolder called /client-prep/[client-name] and drop the inputs in. Or just tell Cowork the structure you want and let it build it for you:
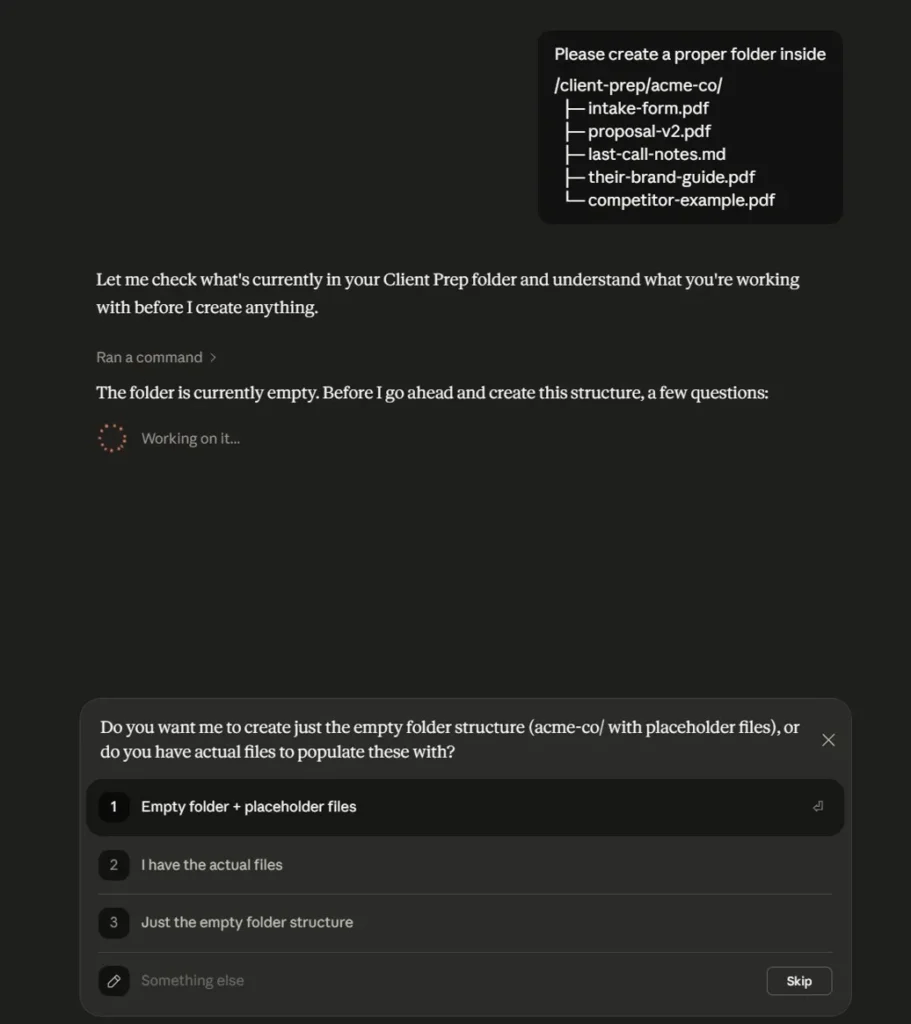
FOLDER
/client-prep/acme-co/
  ├─ intake-form.pdf
  ├─ proposal-v2.pdf
  ├─ last-call-notes.md
  ├─ their-brand-guide.pdf
  └─ competitor-example.pdf
Cowork asks clarifying questions before creating anything. Answer those and it shows you the plan, every file it’s going to create and what goes inside each one.
Approve and it starts building. The Progress panel on the right tracks each step in real time.
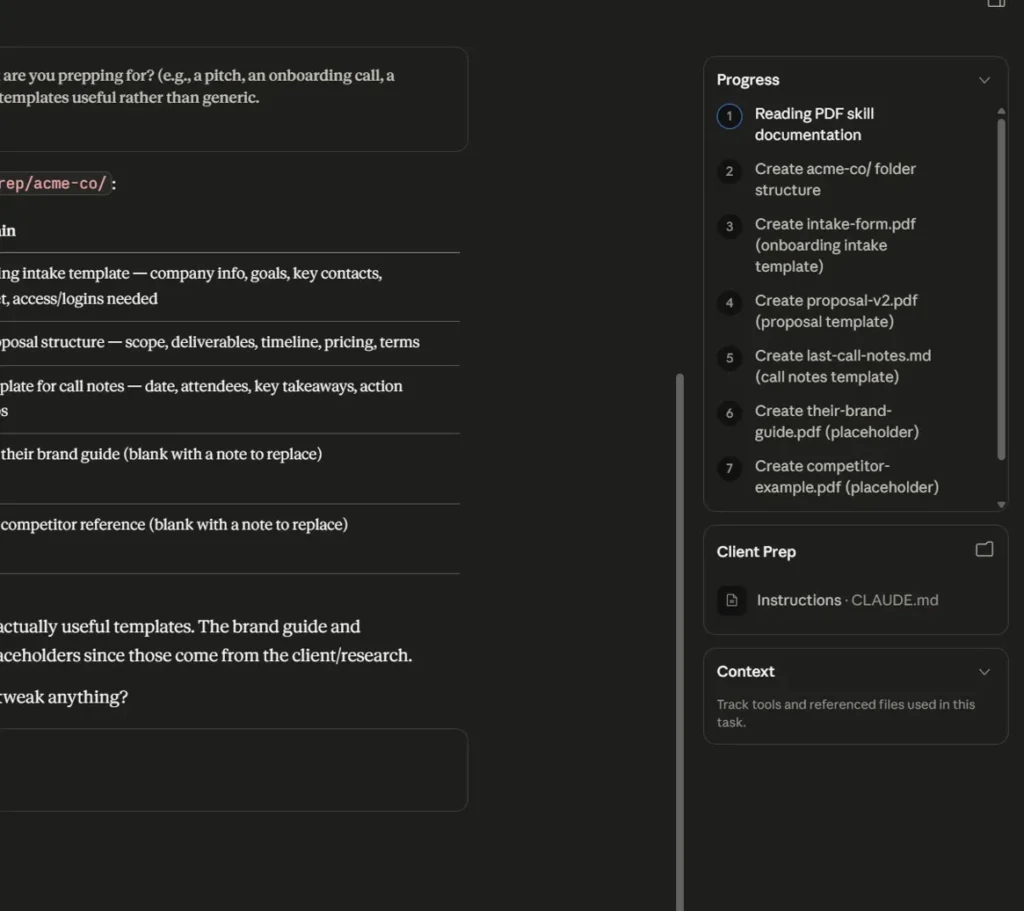
When it’s done, you get a clean summary of what’s in the folder.
The prompt
Once your folder has real client files in it, run the actual prep task. Open a New task in the client-prep/acme-co folder and paste this:
PROMPT
Prep me for my 3pm call with [CLIENT NAME].

Read all files in this folder:
- Their intake form
- The proposal I sent them
- My notes from our last call
- Any other docs they've shared

Before doing anything, show me your plan: list which files you found,
what you'll read from each, and what the output will look like.
Wait for my approval.

Then produce a one-page briefing doc with these sections:

1. Key things they care about — pull directly from the intake form
   and last call, 3-5 bullets max
2. Gaps between what they said and what we proposed — where does our
   proposal not match what they actually asked for?
3. 3 questions I should ask on the call — questions that either
   uncover scope issues early or build trust
4. Red flags — anything in their messaging that suggests budget
   concerns, buying process issues, or misaligned expectations

Save the output as:
/outputs/client-prep-[client-name]-[today's date].md

Do not send anything, do not email anyone, do not modify the source files.
Read-only on inputs, write to outputs folder only.
Copy, adjust [CLIENT NAME], run it. Cowork shows the plan, you approve, and five to ten minutes later the briefing doc appears in /outputs. Ready to read before the call.
Read the plan. If it looks right, approve. If it missed something, redirect. This is the checkpoint that makes Cowork safer than running an autonomous agent on live files.
Build a reusable task template in Cowork
Save your best prompts in a /prompts subfolder inside your Project. Next time you need to run the same task, paste the prompt and swap the variables (client name, date, folder path).
Once you’ve run a prompt 3+ times and the output is consistently good, promote it to a Skill so Claude triggers the behavior automatically whenever the task pattern matches. More on Skills in Step 6.5.
More workflows worth walking through
Client prep is one pattern. Here are two more that run the same way but solve different problems.
Content creator: weekly content audit
You publish regularly and need to know which posts are slipping before they flatline. Instead of logging into Search Console, pulling CSVs, and comparing numbers manually, hand Cowork the job.
Connect Google Search Console (or your analytics MCP), point it at your blog’s URL list, and run this:
PROMPT
Pull the last 14 days of GSC data for [your-site.com].
Show me:
1. Pages where impressions dropped more than 20% vs the prior 14 days
2. Pages where position slipped by 2+ spots
3. Any page that lost clicks but gained impressions (CTR problem)

Format as a markdown table sorted by biggest drop first.
Save to /outputs/content-audit-[today’s date].md

Do not modify any live content. Read-only.
Run it once manually. When the output looks right, schedule it weekly (Friday morning works, gives you the weekend to plan updates). After two weeks of good output, promote it to a Skill.
Agency owner: Monday client status roll-up
You manage 5-10 clients and Monday mornings are 30 minutes of tab-switching between Slack, email, and your CRM to figure out who needs what this week.
Connect Slack + Gmail + your CRM (GoHighLevel, HubSpot, whatever). Create a Project folder with a /clients subfolder containing one markdown file per active client (name, current project, last milestone, next deadline).
PROMPT
Check these sources for activity from the last 7 days:
- Gmail: threads involving [client list or domain names]
- Slack: messages in [channel names or DMs]
- CRM: deal stage changes, new notes, upcoming tasks

Cross-reference against the client files in /clients/.

Produce a status roll-up with one section per client:
- Last activity (source + date)
- Open items needing my response
- Upcoming deadlines this week
- Risk flag if no activity in 7+ days

Save to /outputs/weekly-status-[date].md
Do not send anything. Do not reply to any emails or messages.
The pattern is always the same: connect the tools, scope the folder, describe the output, test it, schedule it.
Step 6: Turn It Into a Scheduled Task
Once a task works well manually, the next upgrade is scheduling it to run automatically.
Click Scheduled in the left sidebar.
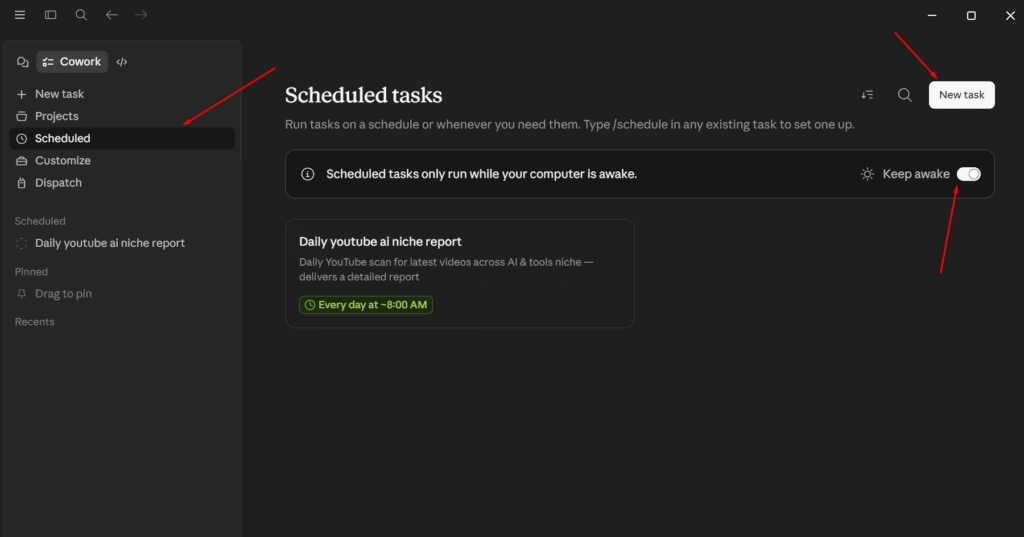
Two things to notice:
- The banner at the top: “Scheduled tasks only run while your computer is awake.” This is the single most common reason scheduled tasks fail silently. Toggle Keep awake on if you want them to fire reliably.
- The New task button top-right.
Two ways to create a scheduled task
There are two paths. The form works when you know exactly what you want. Conversation works when you don’t.
Path 1: The manual form
Click New task.
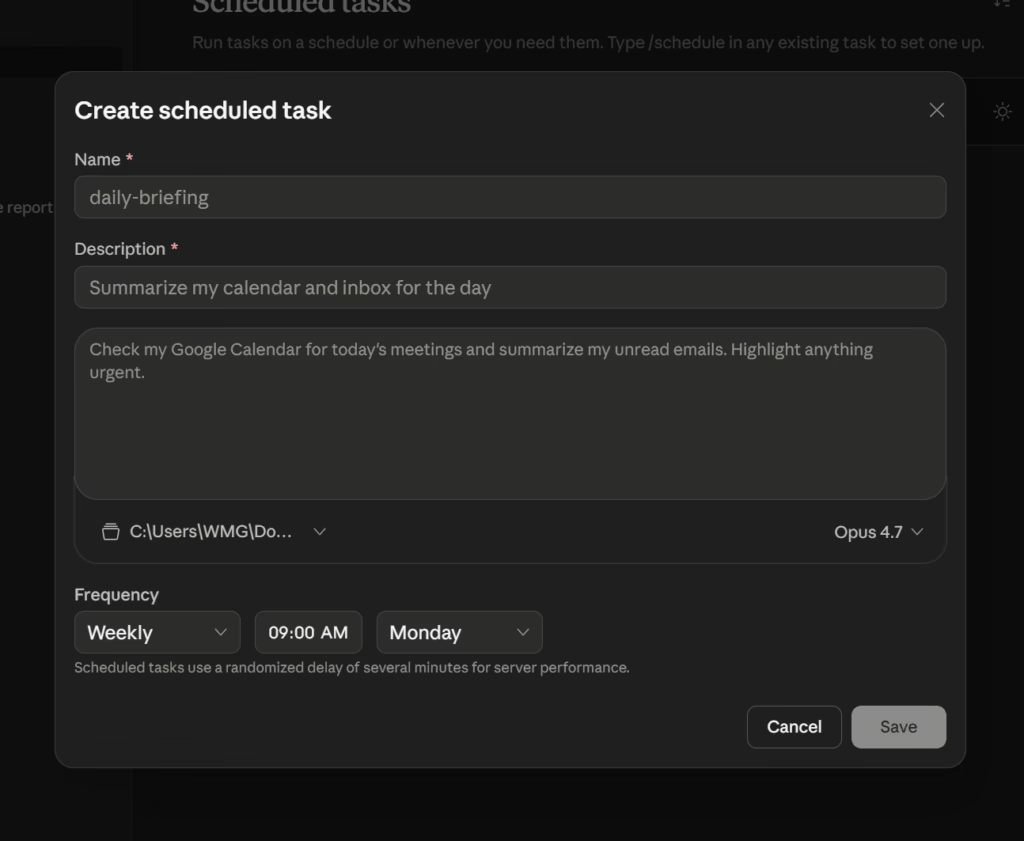
Fields:
- Name: short identifier, used in the sidebar and logs
- Description: one-liner for your own reference
- Prompt: the full instruction Cowork runs. Write it the same way you’d write a New task prompt.
- Model: leave on Default unless you have a reason to pick a specific one
- Folder to work in: which Project folder this task operates in
- Frequency: how often to run (options: Manual, Hourly, Daily, Weekdays, or Weekly)
Fill it out, hit Save, you’re done.
Path 2: Let Claude build it for you
This is the faster path when the prompt isn’t fully formed in your head yet. Open a regular Cowork task and just describe what you want to schedule.
Example: “Schedule a task to run every 24 hours. I want it to scrape YouTube and check for the latest video posts in my niche.”
Claude won’t start building blind. It’ll load the scheduling skill and ask clarifying questions first like, what is your niche?, How often should this run?, What should the output look like?
Answer each one in simple language. Claude uses your answers to write the full scheduled task prompt, set the frequency, and name the task. Then it creates it and shows you exactly what got configured:
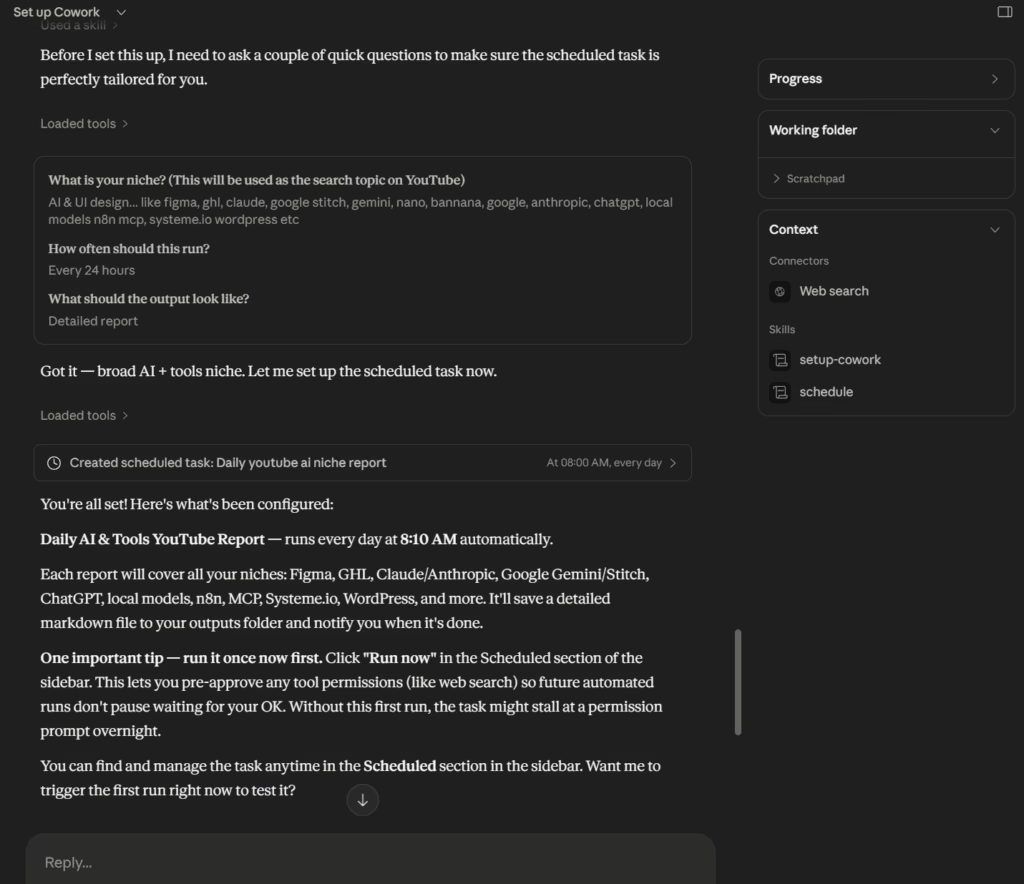
You review, accept, done. If something looks off, ask Claude to make edits before it’s saved.
This is the path I’d use for 80% of scheduled tasks. It’s faster than the form, and Claude usually writes a tighter prompt than you would first pass.
The “run it once first” rule
When Claude creates a scheduled task for you, it’ll flag this in the confirmation. Worth calling out because it saves you a stalled overnight run:
Run it once manually before letting it go on autopilot. Click Run now on the task page. This pre-approves any tool permissions (web search, connector access, file writes) so the first real scheduled run doesn’t pause waiting for your approval at 8 AM while you’re asleep.
If you skip this step and the task needs to use a tool that requires approval the first time, the scheduled run stalls silently. You come back expecting a report and find a prompt waiting for an OK from three hours ago.
Always run it once manually. Then trust the schedule.
Managing scheduled tasks after setup
Click any task in the Scheduled list to open its detail page:
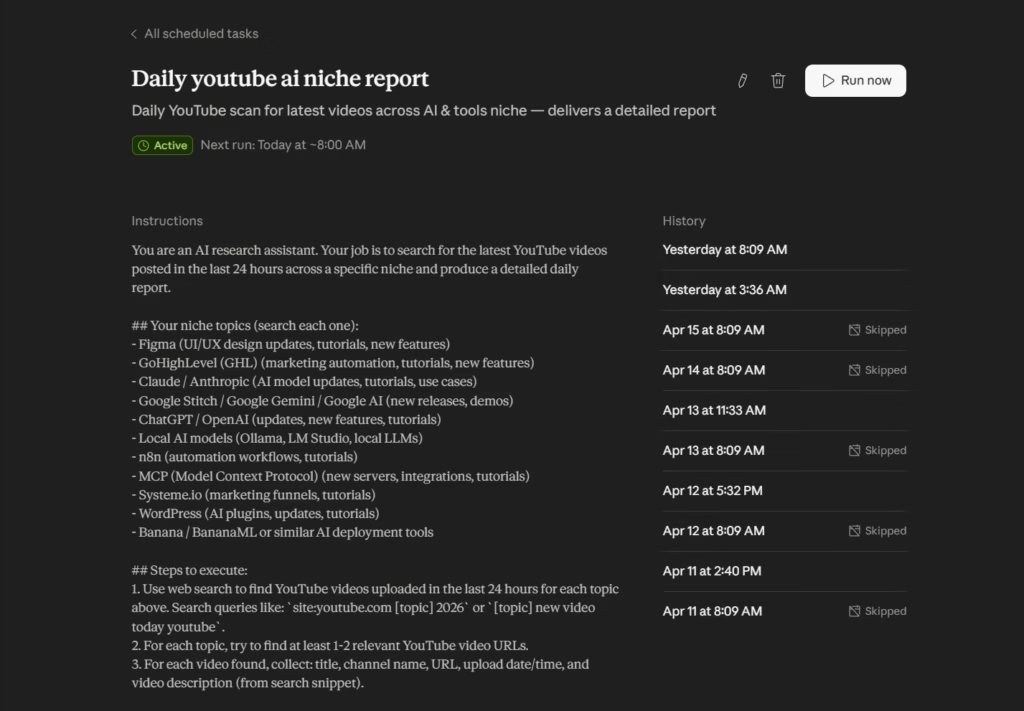
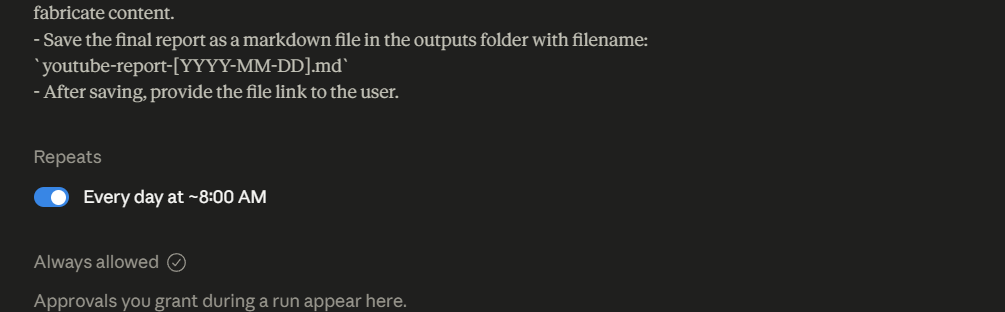
Three things worth knowing about this view:
- Active / Inactive toggle, pause a task without deleting it
- Next run timestamp, confirms when it’ll fire next
- History, every previous run, with Skipped entries visible when your machine was asleep at fire time
That History column, if every other run shows “Skipped,” your Keep awake setting isn’t doing what you think it’s doing. Either toggle it back on or adjust your system sleep timer.
You can also hit Run now from this page anytime, useful for testing after edits or catching up after a missed window.
What to schedule (and what not to)
Good candidates:
- Morning briefing (Gmail + Calendar + Slack summary) → Weekdays, 7:30 AM
- Weekly status report draft → Friday, 4:00 PM
- Daily competitor check on your niche → Daily, 8:00 AM
- Monthly folder cleanup → Manual, run when needed
Bad candidates:
- Anything that auto-sends to clients without your review (schedule the draft, not the send)
- Tasks where the output has to be perfect every time (LLMs have variance, scheduling amplifies it)
- Anything that burns a lot of tokens on every run – the bill adds up
One more thing: Cowork scheduled tasks run on your machine, which means they need your computer awake. If you need something that fires at 2 AM whether your laptop is open or not, look into Routines. Full setup walkthrough here: Claude Routines.
Claude Routines is a scheduled, recurring AI agent workflow in Claude Code that runs on Anthropic’s cloud infrastructure.
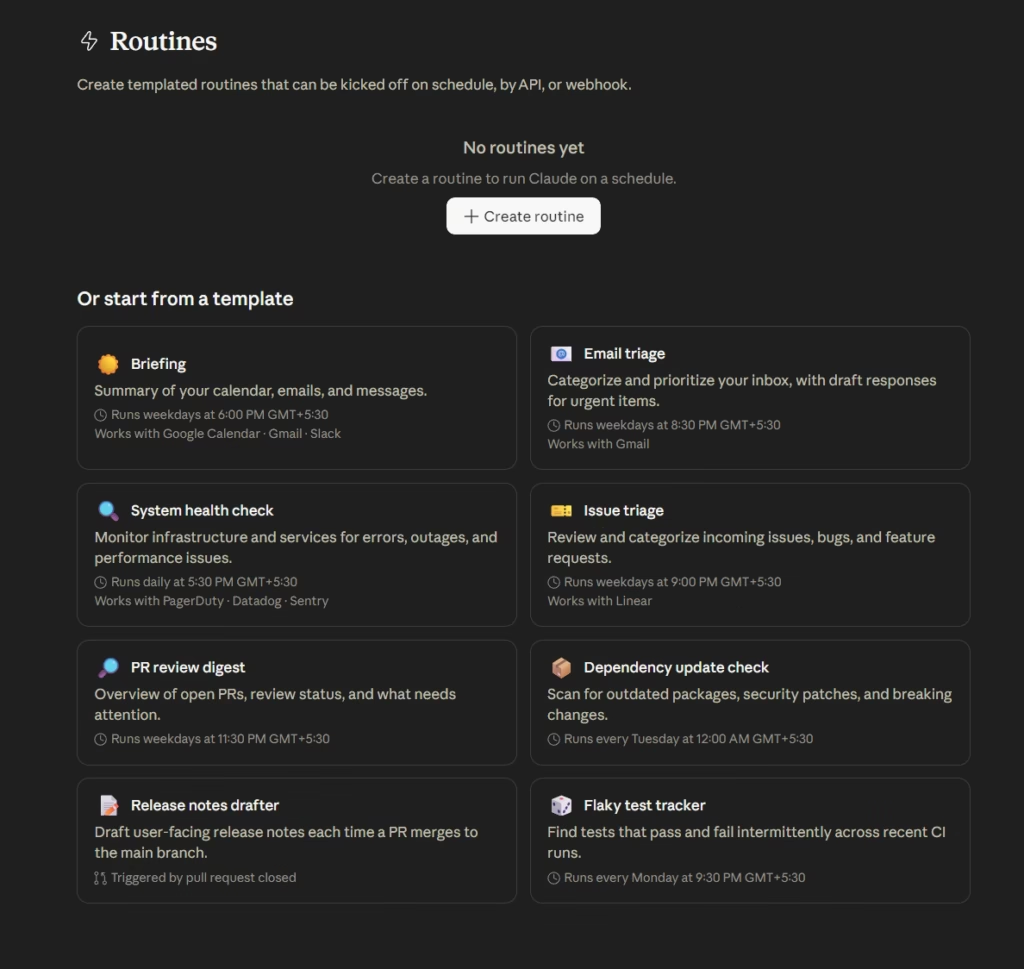
It triggers from schedules, APIs, or GitHub webhooks, and keeps working even when your machine is off.
The tradeoff is it can’t touch your local files. Use Cowork schedules for local work, Routines for cloud-connected automations.
Step 6.5: When a Task Becomes Repeatable, Turn It Into a Skill
Once you’re running the same task over and over, prompts start feeling like overhead. You keep pasting the same 400-word briefing template. Every new client call, every weekly report, every content draft.
That’s the moment to promote the prompt to a Skill.
A Skill is a reusable bundle of instructions Claude pulls in automatically whenever a task matches the skill’s trigger. You build it once. After that, “prep me for my call with Acme” is enough, Claude loads the client-prep skill in the background and runs it.
Where Skills live
In the Customize panel (same place as Connectors), click Skills.
Two sections: Personal Skills (yours, editable) and Built-in Skills (Anthropic’s, included).
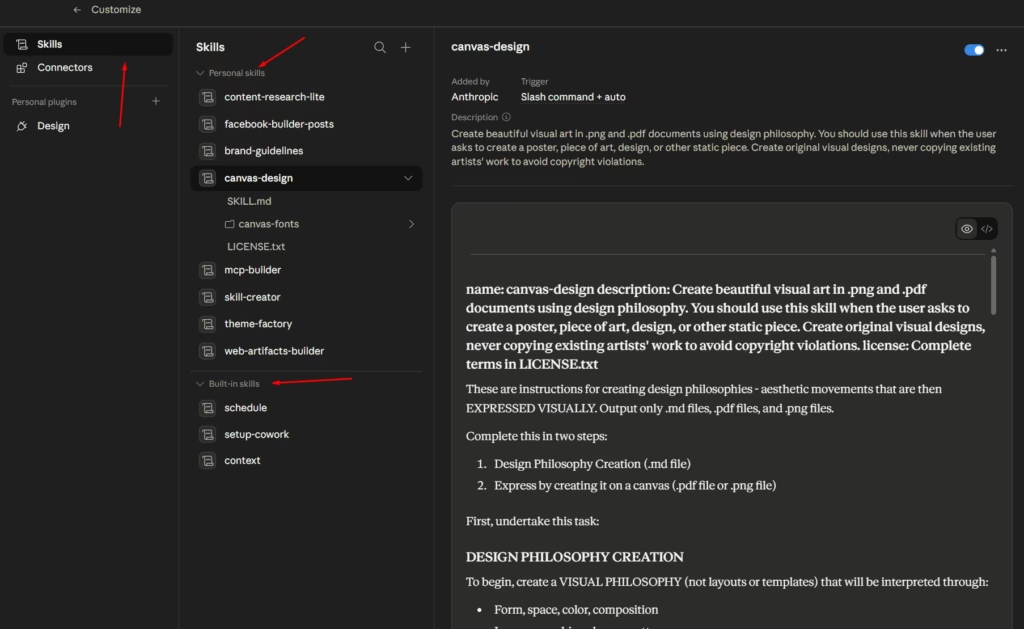
Creating a Skill
Hit the + icon top-right. Three paths:
- Browse Skills: pick from Anthropic’s directory (canvas-design, mcp-builder, theme-factory, skill-creator, brand-guidelines, and more)
- Create with Claude: conversational. Tell Claude what the skill should do, it builds the
SKILL.mdfor you. Easiest path. - Write Skill instructions: short form. Name, description, instructions. Good for simple Skills.
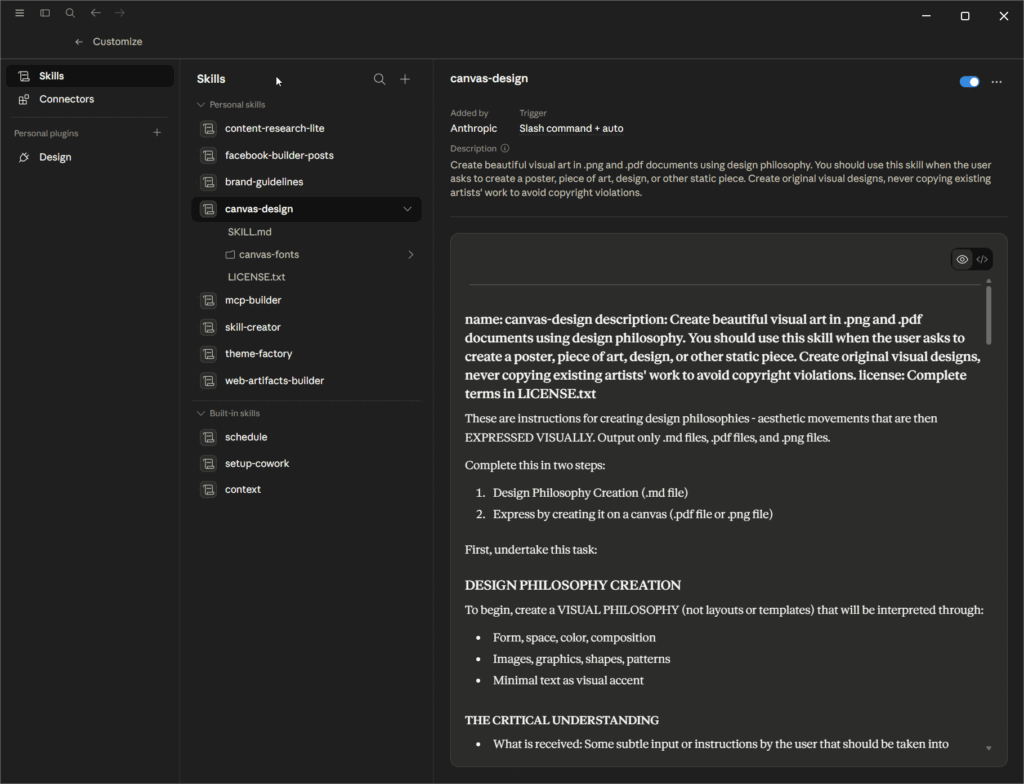
Under the hood, Skills are just markdown files in a .claude/skills/ folder. On Mac that’s ~/.claude/skills/, on Windows it’s %USERPROFILE%\.claude\skills\. Each skill is its own subfolder with a SKILL.md file inside.
The prompt → template → skill ladder
The rule I use mostly:
- First time → Write a prompt from scratch
- Second or third time → Save the prompt as a template in
/prompts - Fourth time and beyond → Promote it to a Skill
Running the same task monthly? Not worth a Skill. Running it weekly? Absolutely.
Full walkthrough on authoring Skills from scratch, structuring triggers, and best practices for SKILL.md is in Claude Code Skills and Hooks: The Complete Guide for Non-Developers.
Step 7: Wire Up Dispatch (Phone → Desktop)
Dispatch is the feature that lets you fire off Cowork tasks from your phone while your desktop runs them.
Walking to a meeting and remember you need the last three months of GSC data pulled into a report? Open the Claude mobile app, message Dispatch, done. You come back to a finished file.
Requirements
- Latest Claude desktop app (Mac or Windows)
- Latest Claude mobile app (iOS or Android)
- Both signed into the same account
- Desktop stays awake and the app stays open while tasks run
Setup
Click Dispatch in the Cowork sidebar.
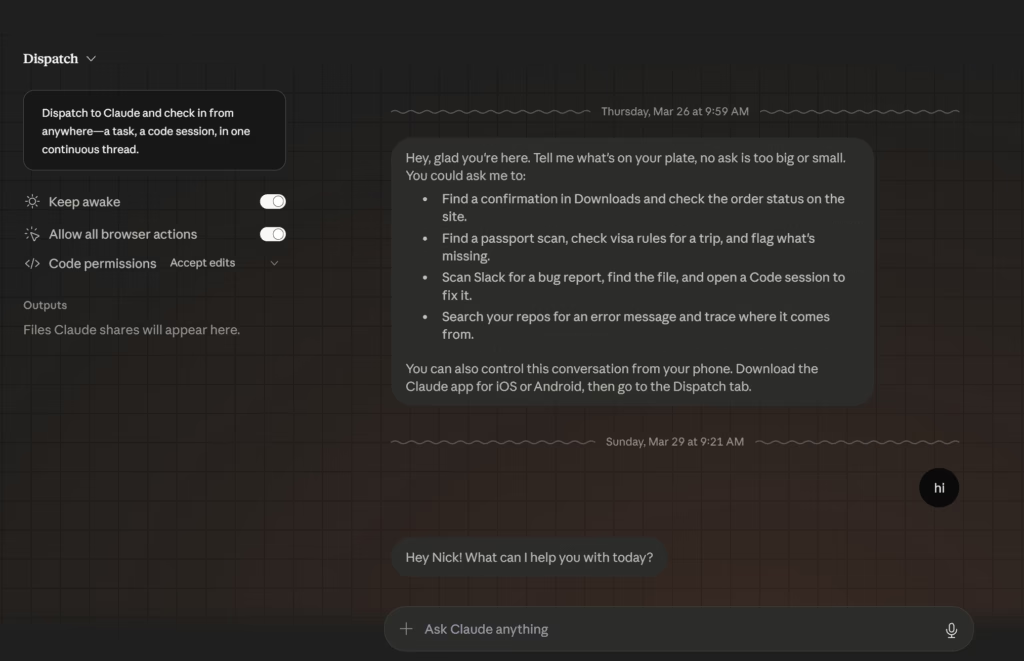
You’ll see a few toggles on the left:
- Keep awake: prevents your computer from sleeping while Dispatch is active. Turn this on.
- Allow all browser actions: lets Claude navigate your browser autonomously through Claude in Chrome. Turn on if you want web tasks through Dispatch.
- Code permissions: set how Cowork handles file edits triggered from phone (Accept edits is the default)
Then pair your phone:
- Click Get started if Dispatch isn’t paired yet
- Scan the QR code with your phone’s Claude app
- You’ll see a Dispatch tab appear in the mobile app
- From there, message Claude like you’d message anyone else
What actually works from phone
Dispatch is great for:
- Summarize and retrieve: “Pull last quarter’s numbers from
/financesand make a one-pager” - Research and compile: “Find the top 5 articles published this week on [topic] and send me a TL;DR”
- Triage: “Check my inbox for anything marked urgent from [client list] and summarize”
- Queue work for later: send a task on the commute, desktop runs it, results waiting when you get in
What doesn’t work well
- “Open this app and click here”, screen-level control from phone is unreliable
- Anything that needs live judgment mid-task, Dispatch is fire-and-forget, not back-and-forth
- Completion notifications, there aren’t any right now. You have to open the app to see if it’s done.
A Few Things That Could Trip You Up
I hit every one of these in my first week. Saving you the same frustration.
First VM boot is slow
That 2GB download happens the first time you open Cowork. It’s not broken, it’s initializing. Let it finish before you try to run anything.
Mac needs extra permissions for computer use
If you want Cowork controlling your screen directly (computer use, Pro and Max plans only), macOS requires you to enable Screen Recording AND Accessibility for the Claude app under System Settings → Privacy & Security. And macOS Sequoia re-prompts you to renew these every 30 days.
On Windows the permission step is lighter and usually handled at install.
Cowork burns ~20x the compute of regular chat
A single Cowork session consuming files, running multi-step logic, and calling connectors costs way more usage than the same kind of back-and-forth in Chat.
Pro users hit the usage wall on Cowork much faster than on Chat. If you’re going to run Cowork daily, budget for Max.
Opus 4.7 uses more tokens for the same text
While I was editing this article, Anthropic launched Opus 4.7. Same pricing as 4.6, but with an updated tokenizer. The same text now produces 1.0 to 1.35x more tokens than it did on 4.6.
Worst case, that’s 35% more tokens for identical content. If you were already bumping up against usage limits on Cowork, 4.7 makes that wall arrive faster.
Worth checking your token consumption after the update and adjusting your scheduled tasks if needed.
Computer use is Pro/Max only
Team and Enterprise plans don’t get computer use yet. Everything else works, but if you need Claude clicking around your desktop (not just using connectors and files), you need a Pro or Max subscription on the side.
Treat Cowork like a new hire with the keys to the office
Cowork can read your files, call your connected apps, and run commands on your machine. That’s the whole point, but it also means a bad prompt, a sketchy MCP server, or a prompt injection hidden in a webpage can cause real damage.
Practical rules: don’t connect your banking or health apps. Don’t give it access to folders with credentials or API keys sitting in plaintext. Start every new connector on Needs approval until you’ve watched it work.
Dispatch has no completion notifications
Send a task from your phone, and there’s no push notification when it finishes. You have to open the mobile app to check. This will probably get fixed eventually. For now, set a reminder if you’re timing-dependent.
What to Automate Next
Once you’ve got one workflow running, the question is what to build next. Here are real setups worth exploring, grouped by the kind of work they replace.
Content production
- Draft blog posts to CMS: connect the WordPress/Webflow/GHL, point Cowork at a folder with research notes, and have it draft a post and push it as a draft. You review in the editor, not in Claude.
- Build a social media Skill: create a Skill that takes a long-form piece and outputs a LinkedIn post, an X thread, and a newsletter intro in your voice. Run it every time you publish.
- YouTube niche monitoring: schedule a daily task that searches YouTube for new videos in your niche topics and delivers a markdown report every morning.
Design
- Connect Figma: Cowork can pull designs, inspect layers, and suggest copy or layout changes. Useful for reviewing client mockups without opening Figma yourself.
- Connect Canva: edit designs, swap text, or create new assets from templates directly through Cowork.
- Build a Remotion Skill: if you’re generating video assets programmatically, a Skill that feeds content into your Remotion pipeline saves the manual handoff.
Analytics and SEO
- Weekly performance dashboard: connect Google Analytics, Google Search Console, and Ahrefs. Schedule a Friday task that pulls traffic, rankings, and top pages into one report. Spot problems before they become trends.
- Content decay alerts: have Cowork check which posts dropped more than 20% in traffic month-over-month and flag them for updates.
CRM and client work
- Connect HighLevel, HubSpot, Zoho, or Clay: pull deal data, enrich leads, or draft follow-up emails based on pipeline activity.
- Client onboarding automation: point Cowork at a new-client intake folder, have it generate a welcome doc, project timeline, and first-week checklist.
Dev and ops
- Connect GitHub: pull PR summaries, review changelogs, or generate release notes from commit history.
- Connect Atlassian: summarize Jira tickets, flag blocked items, or compile sprint reports.
This is the surface. Once you have connectors and Skills wired up, the combinations are basically limitless.
The pattern is always the same… connect the tool, describe the output, test it, schedule it or build a Skill around it.
Full walkthroughs on the highest-value setups coming in a follow-up post.
Closing
The 45 minutes you spent on this setup isn’t the point. What you do with the 5-10 hours a week Cowork gives back is.
If you’re building anything, content, products, client work, systems, the assembly work around the actual creative act (gathering inputs, formatting outputs, pulling data, drafting summaries) is where most of your time quietly goes.
Cowork clears that. What’s left is the work that actually compounds. Point it at one workflow. Watch how it handles it. Then point it at the next one.
For what to do with the time you get back, the distribution-first playbook is the next stop.
See you in the next one. PEACE✌️
Frequently Asked Questions
About

Nick Chauhan
Web Developer & Founder Of PixelNThings
I build AI-powered systems that actually ship. Agents, automations, full-stack apps. Claude, Cursor, Gemini, MCP, n8n, Stitch etc.. Also design high-converting funnels and website on Systeme.io, WordPress & GoHighLevel. I post what I build.

