


I use Obsidian daily. I also use Claude Code daily. At some point it made sense to connect them, and when I went looking for how to do it, I found five different methods, five different Reddit threads, and zero articles that actually compared all of them in one place.
Then on April 3rd, 2026, Andrej Karpathy posted about using Claude Code to build what he called an LLM Wiki, a structured knowledge base compiled from raw notes into organized markdown files.
19 million impressions on X and counting. The PKM community immediately connected it to Obsidian (Karpathy himself uses raw markdown and gists, not Obsidian specifically), and the entire space went nuclear because it solved the one problem every Claude Code user runs into: context loss.
Claude starts every session fresh. Total amnesia. It doesn’t remember what you talked about yesterday unless you’ve set up CLAUDE.md files or auto-memory, and even those are scoped to coding projects.
Your Obsidian vault is where the contextual knowledge lives, the thinking, the decisions, the research, the stuff that makes Claude’s output relevant to your specific situation instead of generic.
And because Obsidian stores everything as plain markdown files on your local machine, no proprietary format, no cloud-only lock-in, Claude Code can read and write to it with zero friction. It’s just a folder of .md files. Claude already knows how to work with those.
This article covers both sides. First, the five ways to wire Obsidian and Claude Code together, tested and compared.
Then the memory system that turns this from a neat integration into something that actually compounds in value over time, plus the limitations nobody talks about and how to build the full stack around it.
If you’re an Obsidian user who wants Claude Code working inside your vault, or you’re trying to figure out whether the LLM Wiki approach is worth your time, this is the complete picture.
What Changes When Claude Code Can Read Your Vault
VS Code and Cursor give Claude Code your codebase. That’s useful if you’re building software. But your codebase doesn’t contain your thinking.
Your product decisions, your content strategy, your research notes, your SOPs, your competitive intelligence, your “why we did it this way” notes, all of that lives somewhere else. For a lot of people, that somewhere is Obsidian.
Obsidian has 1.5 million+ active monthly users, and its active users spend an average of 43 minutes a day inside the app. The ecosystem backs this up… over 2,740+ community plugins, 1,000+ active themes, and a 183,600+ member Discord community building on top of it.
The practical use cases are real. Product managers are using this to auto-generate PRDs from scattered meeting notes. Developers are having Claude check past architecture decisions before making new ones.
Content operators are dumping raw voice transcripts into an inbox folder and letting Claude process, tag, and file them automatically.
The gap isn’t the technology. The gap is that most people don’t realize their vault and their AI agent can talk to each other. Once they do, the question becomes how.
5 Ways to Connect Obsidian and Claude Code
Before you pick one, understand that these aren’t just different setups, they’re different levels of depth. The further down the list you go, the more capability you get and the more you have to configure. Start from the top and stop when it does what you need.
Method 1: Just Point Claude Code at Your Vault Folder
The simplest approach. No plugins, no configuration, no dependencies.
Open your terminal, navigate to your Obsidian vault directory, and run claude. That’s it. Claude Code now has read and write access to every file in your vault.
You can also add your vault as an additional working directory in Claude Code’s settings if you want it accessible alongside a code project.
If you’re using the Claude Code desktop app, you select your vault folder as the project directory from the dropdown. Same thing, no terminal needed.
Claude can now read any note, create new ones, search across files, and edit existing content. It treats your vault like any other project folder.
That works, but there’s a catch.
Claude Code is a software engineering agent out of the box, not an Obsidian-aware tool. Drop it into a vault with no context and it will often make a mess of things.
It might try to “fix” your [[wikilinks]] by converting them into standard Markdown links. It might flag your frontmatter as broken syntax.
It might follow a link reference and have no idea what to do with it because it doesn’t know that [[Concept]] means there’s a file called Concept.md somewhere in your directory.
The reason is straightforward. Claude Code doesn’t have an internal map of your Obsidian graph. It relies on its built-in CLI tools like grep and file-read commands.
When it reads a note and hits [[AI Funnel Builder]], it doesn’t click the link. It has to search your directory for a file named AI Funnel Builder.md. And it will only do that reliably if you tell it to.
The fix is a CLAUDE.md file at the root of your vault, and it’s not optional. This is what actually makes Method 1 work properly.
The CLAUDE.md file acts as a persistent system prompt. Every time Claude Code opens your vault, it reads this file first. That’s where you define how Obsidian works, what your conventions are, and how you want it to behave.
Without it, you’re running a generic agent on a specialized knowledge system and hoping it figures it out. It won’t, not consistently.
At minimum, your CLAUDE.md should tell Claude three things… that this is an Obsidian vault and not a code project, that [[wikilinks]] are valid syntax and should never be converted or flagged, and that when it encounters a [[wikilink]] it should resolve it by searching for the matching .md file in the directory.
You can also add your frontmatter schema, your folder structure logic, your tagging conventions, and any note templates you want it to follow when creating new files.
Give it the rules and it stops acting like a code linter and starts navigating your vault the way you’d want it to, reading connected notes, respecting your structure, and writing back into your system without breaking anything.
That’s Method 1 done right. It’s the foundation every other method builds on.
Method 2: Install Official Obsidian Skills
This is the method most people don’t know about yet, and it’s the one that should be the default for everyone.
Obsidian Skills is a set of instruction files created by Steph Ango, also known online as kepano, the CEO of Obsidian, that teach Claude Code how to properly handle Obsidian-specific features.
Wikilinks, frontmatter YAML, Bases, JSON Canvas, tags, the whole ecosystem.
Skills are plain text files. You clone the repository into a .claude folder at the root of your vault, and Claude Code reads them automatically at the start of every session.
No plugin to install, no server running in the background. Just files that tell Claude how your system works.
Folder
your-vault/
  .claude/
    skills/
      obsidian-markdown.md
      obsidian-bases.md
      obsidian-canvas.md
What makes this different from just dumping instructions into CLAUDE.md is that these skills are structured, tested, and maintained by the person who built Obsidian.
They follow the Agent Skills specification, which means they work with Claude Code, Codex CLI, and any other skills-compatible agent.
You can also write your own custom skills in natural language. Want Claude to always format daily notes a certain way? Want it to follow a specific tagging convention? Write a skill for it. Drop it in the folder. Done.
This method doesn’t replace the others. It layers on top. Skills teach Claude how to work with Obsidian. The other methods determine where and how Claude connects to your vault.
Install Skills regardless of which integration path you choose.
Best for: literally everyone. This should be step one no matter what else you’re doing.
Method 3: MCP Server for Live Vault Access
MCP stands for Model Context Protocol. It’s the standard that lets AI tools connect to external services through structured server plugins. If you already know what MCP can do for content workflows. The same protocol works for Obsidian.
The main plugin for this is Obsidian Claude Code MCP by Ian Sinnott. It installs as a community plugin inside Obsidian and runs a dual-transport MCP server, WebSocket for Claude Code auto-discovery and HTTP/SSE for Claude Desktop.
Once enabled, it exposes 7 tools that Claude Code can use… reading files, listing vault contents, creating notes, editing text, inserting content, getting the currently active file, and direct Obsidian API access.
I tested this myself. The plugin installed in under a minute, the MCP server started immediately, and I confirmed the tools were live and responding. The server runs on port 22360 by default (WebSocket gets a random port), and you can see both in the plugin settings under “MCP Server Status.”
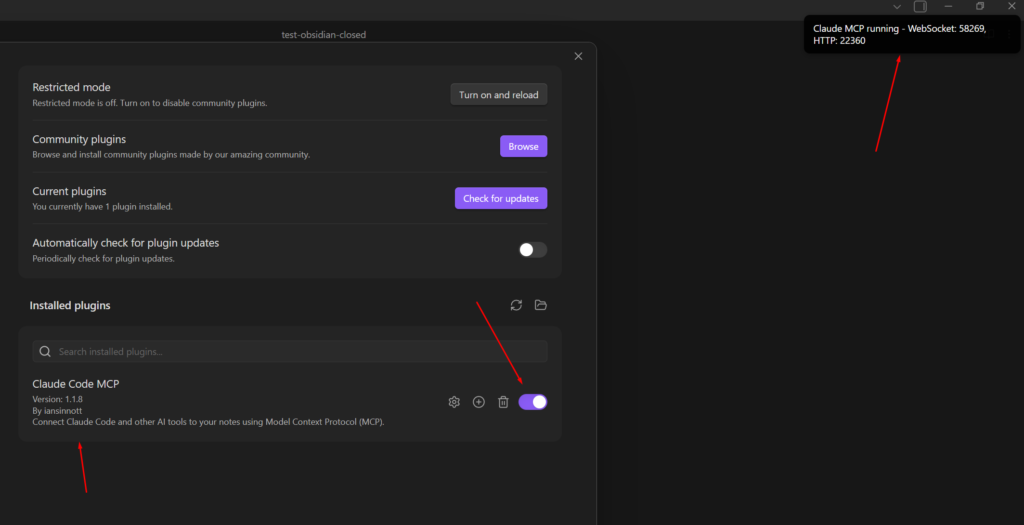
The embedded terminal is a bonus feature of this plugin, it gives you a Claude Code terminal inside Obsidian’s sidebar, so you never need to leave the app.
But there’s a catch… the embedded terminal doesn’t work on Windows (at least for me). It renders, shows a blinking cursor, but doesn’t accept input. I tested this directly, macOS and Linux work fine.
Windows users should run claude from a separate terminal pointed at their vault folder instead.
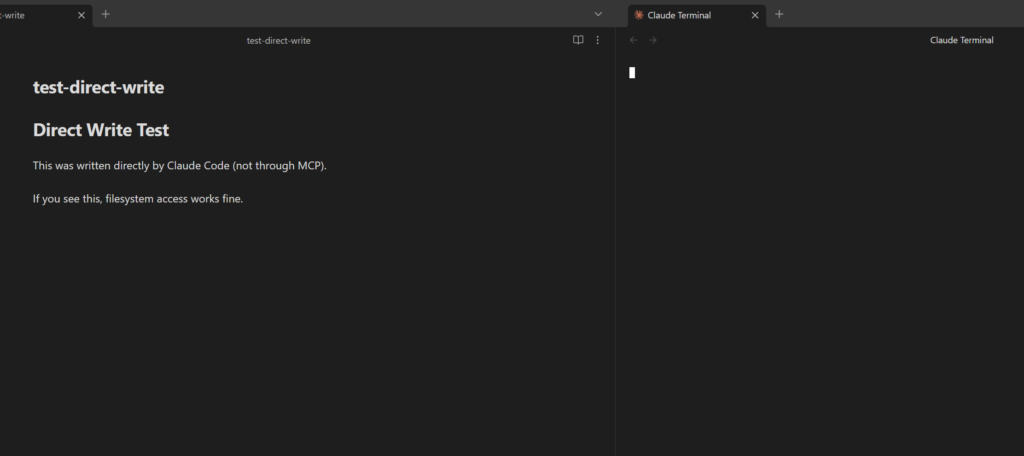
What actually works and what doesn’t:
The MCP server works on all platforms, it’s the part that exposes your vault data to Claude Code. The embedded terminal is the part with Windows issues. These are two separate features.
You can use the MCP server without the embedded terminal by running Claude Code from any other terminal, VS Code, or the Claude Code desktop app.
The auto-discovery via lock files at ~/.claude/ide/ connects them regardless of where Claude Code is running.
The trade-off is Obsidian needs to be open for the MCP connection to work. I tested this too, closed Obsidian, tried to hit the MCP endpoint, got connection refused.
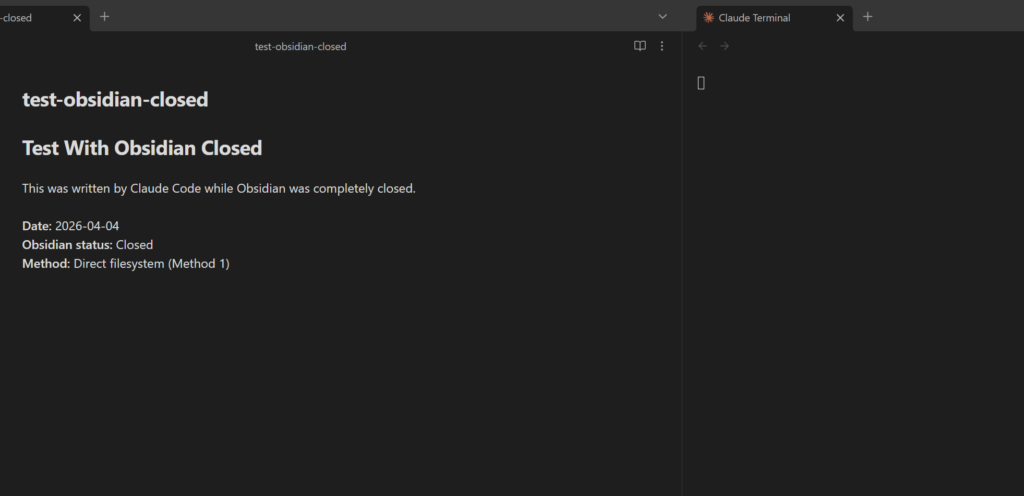

Open Obsidian, server comes back. That’s the deal. If you want vault access without keeping Obsidian open, use Method 1 (filesystem) instead. It works whether Obsidian is running or not.
Port conflicts only matter if you run multiple vaults with the plugin simultaneously. Each vault needs a unique port, but the plugin detects conflicts and walks you through the configuration.
Best for: users who want Claude Code to have structured access to their vault through dedicated tools rather than raw file reads.
Developers running multiple AI clients (Claude Code, Claude Desktop, Cursor) against the same vault. Anyone who wants the embedded terminal experience on macOS or Linux.
Method 4: Claude Code in Obsidian’s Sidebar
If your whole workflow lives inside Obsidian and switching to a terminal feels like leaving the cockpit, this is the method for you.
Obsidian Claude Sidebar by Derek Larson embeds a full Claude Code terminal directly in Obsidian’s right sidebar panel.
Click the bot icon in the ribbon (or set a hotkey), and Claude Code opens right there. You watch it read, edit, and create files in real-time without ever leaving the app.
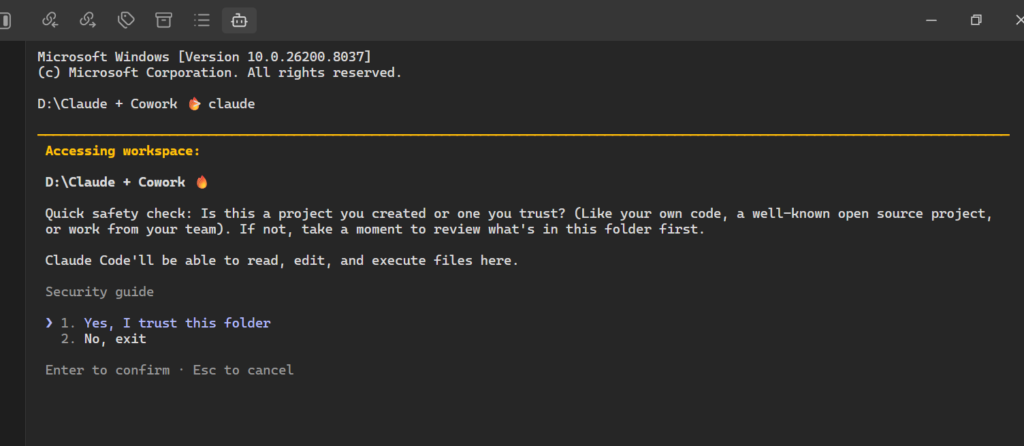
I tested this on Windows. It works, Claude Code launches inside the sidebar, sees your vault files, responds to prompts, and even auto-detects the MCP server from Method 3 if you have both plugins running.
It supports multiple tabs for parallel conversations and pairs naturally with Claude’s slash commands.
Installation via BRAT:
- Install the BRAT plugin from community plugins if you don’t have it
- In BRAT settings, click “Add Beta plugin”
- Enter:
derek-larson14/obsidian-claude-sidebar - Enable “Claude Sidebar” in your community plugins list
Windows users: You’ll see pywinpty not installed when you first open the sidebar. Run pip install pywinpty in your terminal, then restart the plugin. After that, it works perfectly. This is a one-time fix.
Requirements: Claude Code CLI installed, Python 3, and pywinpty on Windows (pip install pywinpty). macOS and Linux work out of the box.
Best for: people who live in Obsidian and don’t want to context-switch. If you’re the type who has 40 Obsidian tabs open and hates alt-tabbing to a terminal, this is your method.
Method 5: Claude Cowork for Non-Technical Users
This one is fundamentally different from the other four. Claude Cowork is not a plugin, not a terminal tool, and not an Obsidian integration.
It’s an entirely separate Anthropic product, a desktop agent powered by Opus 4.6 that can directly interact with your local file system.
You point Cowork at any folder on your computer, including your Obsidian vault, and give it instructions in plain English.
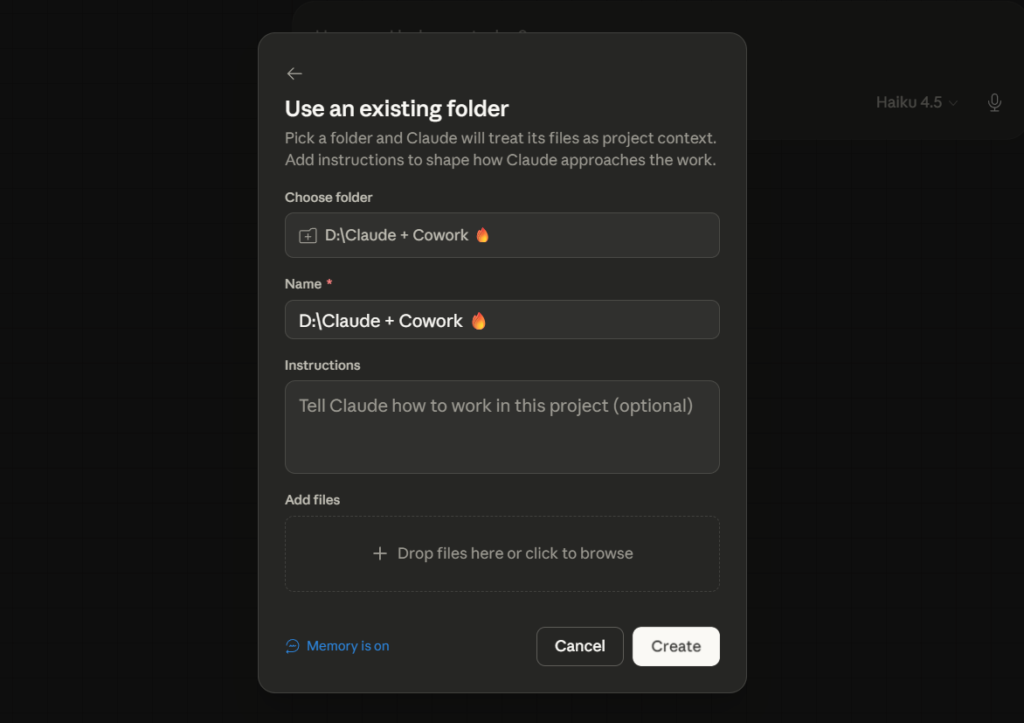
“Organize my inbox folder. Tag everything with the right project names. Create a weekly summary from my daily notes.”
Cowork reads the files, executes multi-step tasks autonomously, and shows you what it plans to do before modifying anything.
It uses Direct File Access (Sandbox) to manage your files and the Computer Use API to click through your apps. There’s no terminal, no manual coding, and no complex plugin setup required, it’s the closest thing to having a personal assistant sit at your desk and organize your life.
Where it’s limited: Cowork doesn’t natively understand Obsidian’s wikilinks, backlinks, or frontmatter schema. It sees markdown files, not an Obsidian vault.
Pairing it with Skills (Method 2) would solve this, but as of now that’s not a native integration, you’d need to provide those conventions manually or through a CLAUDE.md file.
One thing to know about usage: Cowork burns through your quota faster than Claude Code. It navigates by taking and analyzing screenshots, which converts to significantly more tokens than text-based file reads.
For heavy vault processing, a Max subscription ($100/month) is realistic. Claude Code doing the same work via the terminal uses a fraction of the quota.
Best for: non-developers who want AI to process and organize their vault without learning any tools. Product managers, writers, researchers, and operators who think in notes, not code.
Side-by-Side Comparison
| Feature | Filesystem | Skills | MCP | Sidebar | Cowork |
|---|---|---|---|---|---|
| Setup difficulty | None | Easy | Medium | Medium | Easy |
| Terminal required | Yes | Yes | No | No | No |
| Obsidian must be open | No | No | Yes | Yes | No |
| Understands wikilinks | No | Yes | Via Obsidian API | No | No |
| Vault search | Manual | Manual | Structured (7 tools) | Manual | Manual |
| Write to vault | Yes | Yes | Yes | Yes | Yes |
| Auto-discovery | No | No | Yes (WebSocket) | No | No |
| Windows support | Full | Full | MCP server: yes. Terminal: no | Yes (needs pywinpty) | Full |
| Additional cost | Free | Free | Free | Free | Included in plan |
Can understand wikilinks if Skills are also installed alongside these methods.
How Much Does This Setup Actually Cost?
Obsidian is free for personal and commercial use. You only pay if you want their optional add-on services…
- Obsidian Sync: $5/month (monthly) or $4/month (billed annually), syncs notes across devices with end-to-end encryption
- Obsidian Publish: $10/month (monthly) or $8/month (billed annually), publishes notes to the web
Neither is required for any Claude Code integration. For context, Obsidian’s estimated ARR is $25 million, largely from these two add-ons.
The app itself stays free, and because Obsidian is local-first with no built-in analytics, CEO Steph Ango has noted the real user numbers are likely higher than what’s reported.
Claude Code requires a Claude subscription:
- Claude Pro: $20/month, solid for moderate vault work, but you’ll hit the rolling usage cap if you’re running heavy automation sessions
- Claude Max: $100/month, power users processing large vaults, running multiple agents, or doing heavy daily automation.
- Claude API (pay-as-you-go): roughly $3 per 1 million input tokens on Sonnet 4.6, cheaper if your usage is sporadic
Every plugin and skill mentioned in this article is free and open source.
Minimum viable setup: $20/month total. Obsidian free and Claude Pro. That gets you filesystem access, Skills, MCP, and the sidebar plugin.
Everything except Cowork, which comes bundled with your Claude subscription anyway.
The LLM Wiki: From Connection to Compounding Knowledge
Everything above gets Claude connected to your vault. This section is about making that connection actually compound in value over time.
Traditional RAG (retrieval-augmented generation) works like this… you ask a question, the system pulls relevant chunks from a database, Claude stitches an answer, and then forgets everything.
Next session, same process, same starting point. It never gets smarter.
The LLM Wiki works differently. When you drop a new source into your vault’s raw folder, Claude doesn’t just retrieve from it.
It reads the source and updates 10 to 15 wiki pages that relate to it. The knowledge compounds. Next time you ask something related, Claude pulls from richer, already-synthesized pages, not raw chunks.
You’re not querying documents. You’re building a structured knowledge base that Claude can reason over.
How It Works
Three folders, no database required:
- Raw sources folder is where you drop articles, PDFs, transcripts, web clips, anything you want Claude to learn from. The Obsidian web clipper browser extension is the fastest way to get content in here, clip an article, it drops straight into this folder.
- Wiki folder is what Claude builds and maintains. Structured markdown files organized by topic, with wiki-style cross-references between them. Claude writes these, you read them. Each one is a synthesized page, not a raw dump.
- Schema file is your rulebook. It tells Claude the domain, how you want pages organized, your conventions, what to flag. This is where
CLAUDE.mddoes the heavy lifting.
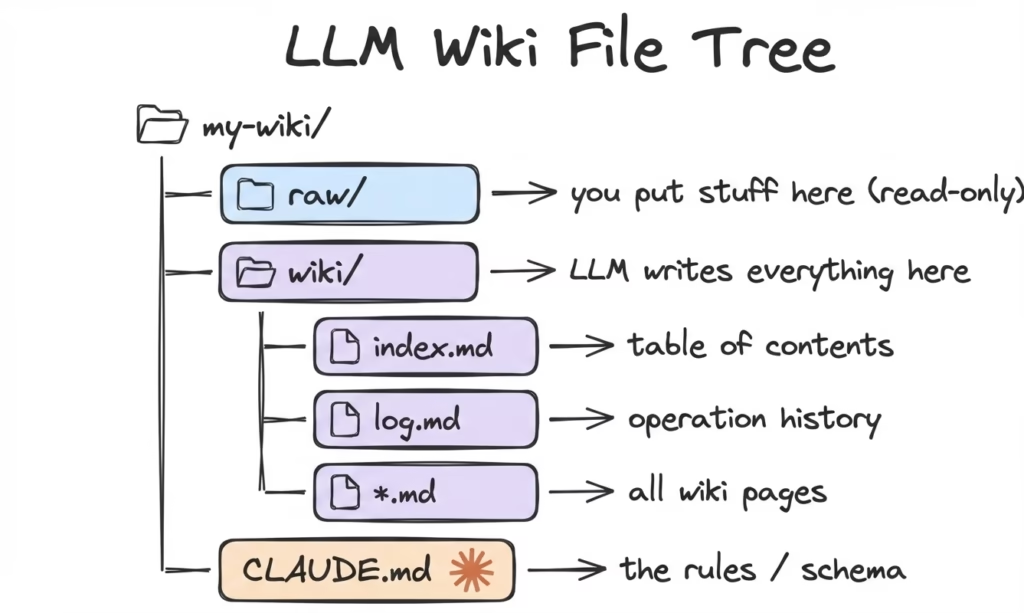
Two files do most of the bookkeeping: index.md (a catalog of every wiki page with a one-line summary) and log.md (a running record of what’s been ingested and what changed).
Claude reads the index, picks which pages are relevant to your query, loads them, reasons over them, and writes updates back.
The Compounding Effect
One source in, 15 files updated in a single pass. That’s the real value.
Drop a new article about LinkedIn growth into your raw folder. Claude reads it, finds every wiki page it relates to, updates each one with the new context, and flags anything that contradicts existing pages.
Contradictions get ironed out, not buried. The wiki gets more accurate with every source, not less.
This is the opposite of how most people use AI. Most people treat Claude like a search engine… ask a question, get an answer, start over. With this system, every conversation makes the next one better.
Setting It Up
Grab the LLM Wiki GitHub repo, copy the system prompt and folder structure, paste it into Claude Code with something like: “I’d like to create a structure in line with the below, ask me any questions, then build it.”
Claude will ask you what domain you’re building for, co-write the schema rules with you, and set up the folder structure.
One useful hack… in Obsidian settings, set your attachment folder path to a fixed directory like raw-assets/. Then set a hotkey to “Download attachments for current file.” Images from clipped articles save locally instead of linking to dead URLs later.
Start with one domain, not everything. One book, one project, one research area. The system works better when it’s focused.
Think of each Obsidian vault as a mini Wikipedia for a specific topic, not a catch-all brain dump.
The loop after first setup is simple:
- Drop a new source into raw
- Claude reads it, updates the related wiki pages
- Ask questions, make decisions, log what changed
- Every few weeks, run a lint pass to catch contradictions and stale claims
Don’t build a custom search interface. Claude Code with your master folder open is already your search engine. Ask it questions directly. Build the fancy stuff only when you’ve actually outgrown the basics.
Where This Setup Falls Short
This is the part most coverage skips. The LLM Wiki system has real limitations that matter if you’re planning to use it past the first week.
- Claude still starts fresh every session. Your vault gives it context, but not persistent memory across sessions unless you build the LLM Wiki layer. Without it, Claude reads your notes at the start of each session on demand, not continuously.
- Large vaults add noise. If your vault is 10,000 notes of random bookmarks, half-finished thoughts, and screenshots with no context, Claude will drown in it. Garbage in, garbage out. The value of this setup scales directly with how well-organized your vault is.
- Personal notes get exposed. Claude Code reads whatever you give it access to. If your vault mixes work notes with personal journals, therapy reflections, or private financial records, scope your access carefully. Use
.claudeignoreor deny rules in settings to block sensitive folders.
- Graph view and Canvas aren’t fully native yet. Without Skills installed, Claude doesn’t understand Obsidian’s graph relationships or Canvas spatial layouts. Skills help, but they’re instruction-based, Claude reads about these concepts, it doesn’t see the visual graph. The graph view looks impressive in screenshots, but I haven’t seen anyone make better decisions because of it. The real value is in the linked markdown files, not the visualization.
- Token cost grows linearly with file count. If you’re running the LLM Wiki, your index file has a one-line summary for every wiki page. At 10 files, that’s maybe 750 tokens to load the index. At 1,000 files, you’re paying thousands of tokens every single query just to scan the catalog before Claude even starts reasoning. At 10,000 files, the math gets ugly fast.
- No semantic search. Claude navigates the wiki by topic headings, not by semantic meaning. If your question uses different language than how the index entry is worded, it might miss relevant pages entirely. Traditional vector search finds things by meaning regardless of the exact words used. Different mechanism, different failure modes.
- Summaries go stale. Wiki pages are synthesized summaries, and summaries drift over time. The LLM Wiki includes a “linting” process in the system prompt, every couple of weeks you run a pass to surface contradictions, orphan pages, and stale claims. If you skip it, the wiki slowly becomes unreliable.
- Not built for large datasets. The wiki system works well up to a few hundred files. If you’re thinking about dumping 184 YouTube transcripts or a full book library into it, you’re using the wrong tool. It’s a reasoning engine, not a storage engine.
The Three-Layer Memory Stack (What Actually Scales Long-Term)
The LLM Wiki setup is one layer. The full Claude memory system is three. Understanding the difference between them is what separates a setup that breaks in six months from one that scales with you.
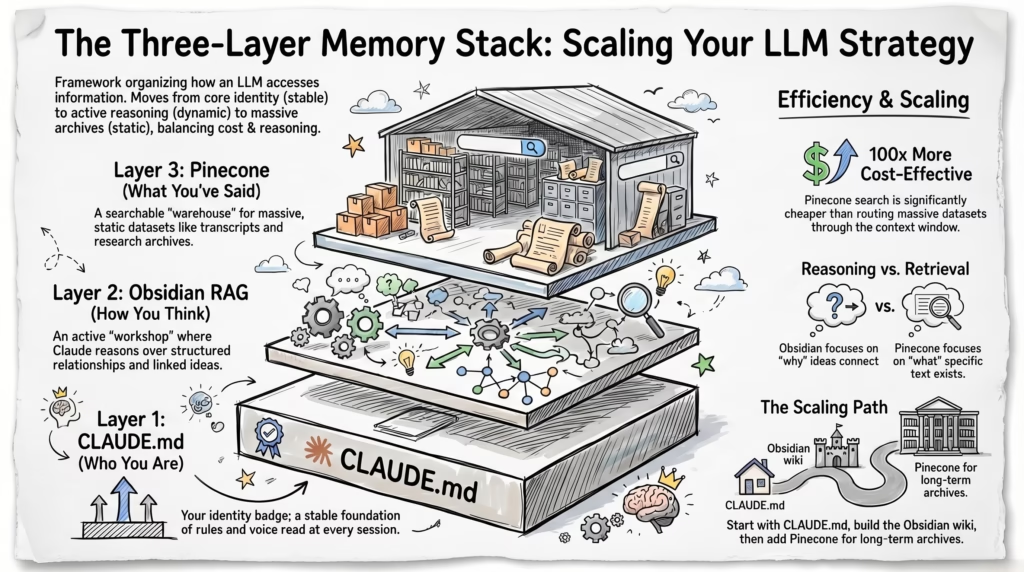
Layer 1: CLAUDE.md (Your Identity)
Your core identity file. Who you are, your voice rules, your conventions, how Claude should approach your work. Read first, every session. This is the layer that never changes day-to-day, it’s your stable foundation.
Think of it as your identity badge. You walk into work, your badge says your name, your role, your access level. It’s checked once at the door and then everyone knows who you are. That’s what CLAUDE.md does for every session.
Layer 2: Obsidian RAG (Your Active Thinking)
Active projects, decision logs, idea development, mental models, research in progress, anything where the relationships between ideas matter. This is the LLM Wiki layer.
Obsidian lets Claude reason over structure. It can trace which hypothesis you revised because of a specific customer conversation, or how idea A from one article connects to the decision in article B.
The wiki-style cross-references are the key differentiator here. Claude doesn’t just retrieve text. It follows links, reads related pages, and synthesizes across them.
This is your workshop. Active, messy, linked, constantly being updated. The place where hard thinking happens.
Layer 3: Pinecone (Your Long-Term Archive)
Transcripts, research archives, books, email history, large static datasets. Anything that won’t change and where exact recall matters more than reasoning over relationships.
Pinecone runs embedding-based semantic search. You store text as vectors, query by meaning, and get back the exact paragraphs you need.
The cost is flat regardless of dataset size. One query against 10 files costs the same as one query against 100,000 files.
Compare that to Obsidian RAG where Claude has to load the index, pick pages, read them, and reason over them, all billable tokens.
For your 184 YouTube transcripts, a Pinecone script runs a nearest-neighbor search without Claude even being involved, and the embedding cost is roughly 100x cheaper than routing everything through the context window.
This is your warehouse. Massive, searchable, cheap to query. The place where everything lives that you might need to recall but won’t actively reason over daily.
How They Work Together
CLAUDE.md is read first, sets the rules. Obsidian is where active work happens, wiki pages getting updated, ideas being connected, decisions being reasoned through.
Pinecone is where you store everything you’ve ever said, written, or recorded, and recall it by asking a question.
Said another way… CLAUDE.md is who you are. Obsidian is how you think. Pinecone is what you’ve said.
You don’t need all three on day one. Start with CLAUDE.md and the Obsidian connection (Methods 1-5 above).
Build the LLM Wiki system when you’re ready for compounding knowledge. Add Pinecone when your archive gets big enough that querying through Obsidian becomes slow or expensive.
The Right Setup Depends on How You Work
Don’t overcomplicate this. Pick the path that matches how you actually work, not the one that sounds most impressive.
“I just want to try it and see what happens.”
Start with Method 1 (filesystem) and Method 2 (Skills). Five minutes of setup. Open Claude Code in your vault folder with Skills installed and start asking it questions about your notes. Zero risk, zero commitment. If it clicks, keep going. If it doesn’t, you’ve lost nothing.
“I’m a developer and I live in the terminal.”
Method 2 (Skills) and Method 3 (MCP). The MCP server gives you structured search and programmatic access to your vault. Skills make sure Claude actually understands Obsidian’s syntax. This is the power-user stack.
“I never want to leave Obsidian.”
Method 4 (Sidebar) and Method 2 (Skills). Claude Code lives right inside your Obsidian UI. You chat, it edits, you see the changes in real-time. Install via BRAT and you’re running in under 10 minutes.
“I’m not technical. I just want AI to organize my notes.”
Method 5 (Cowork). No terminal, no plugins, no configuration. Open the Cowork desktop app, point it at your vault folder, tell it what to do in plain English. It handles the rest.
“I want maximum power.”
Method 2 (Skills) and Method 3 (MCP) and Method 4 (Sidebar). Skills as the foundation, MCP for structured queries, Sidebar for the interface. This is the full stack. It’s also the most moving parts, so only go here if you’ve outgrown the simpler setups.
“I want long-term memory that compounds.”
Any connection method above and the LLM Wiki system (covered in the memory section). Build a focused wiki for one project. Feed it sources. Let it compound. Add Pinecone when you outgrow the wiki’s scale.
Notice that Skills (Method 2) appears in every single recommendation. That’s not an accident. It’s the foundation layer. Install it first, regardless of which path you take.
Vault Structure That Works With Claude Code
Don’t give Claude your entire vault. Scope it to the folders that actually contain useful work context.
A structure that works well…
Folder
your-vault/
  .claude/
    skills/          ← Obsidian Skills live here
    CLAUDE.md        ← persistent instructions for Claude
  Projects/          ← active project notes, specs, briefs
  SOPs/              ← standard operating procedures
  Research/          ← competitive intel, market research
  Content/           ← content ideas, drafts, editorial calendar
  Inbox/             ← raw captures, voice transcripts, quick dumps
  _Private/          ← personal notes (blocked via .claudeignore)
Your CLAUDE.md at the vault root tells Claude who you are, how your vault is organized, and what conventions to follow.
It loads automatically at every session. Between this file and the Skills folder, Claude starts every conversation with full context of your system.
For folders you want Claude to never touch, add a .claudeignore file at the vault root:
_Private_Personal_Finance
This is the adult version of the setup. Full access where it matters, hard boundaries where it doesn’t.
This Isn’t About The Tools
Every tool mentioned in this article is either free or costs less than a lunch. The setup takes anywhere from five minutes to an hour depending on the method. The technology is there and it works.
The rare part is having your knowledge organized well enough that an AI can actually use it. Most people’s Obsidian vaults are digital compost heaps.
They’d get more value from spending an afternoon organizing their notes than from installing every plugin on this list.
Start with filesystem access and Skills. Use your vault for a week with Claude Code reading it. See what’s useful and what’s noise. Then decide if you need MCP, a sidebar, or Cowork.
The best integration is the one you actually use. Not the one with the most features.
See you in the next post. PEACE ✌
Frequently Asked Questions
About

Nick Chauhan
Web Developer & Founder Of PixelNThings
I build AI-powered systems that actually ship. Agents, automations, full-stack apps. Claude, Cursor, Gemini, MCP, n8n, Stitch etc.. Also design high-converting funnels and website on Systeme.io, WordPress & GoHighLevel. I post what I build.

