GoHighLevel Universal Setup Guide
This setup guide works for every GoHighLevel template I sell, funnels, websites, link-in-bio pages, you name it.
The layout might look a little different depending on what you bought, but the basic setup steps are always the same.
We’re using:
- Custom CSS for cleaner spacing + better mobile design
- Reusable color tokens (so you can edit styles easily)
- Simple animations
- Light and dark versions (built on the same layout)
- Sometimes a bit of JavaScript (only if the template needs it, I’ll cover that in the specific template doc)
Honestly, GHL has some limitations, that’s why I use custom code to make your page look more modern and clean.
But don’t worry. If you’re okay making a few small CSS tweaks, you’ll be totally fine. This doc will guide you step-by-step through the basic setup.
Not comfortable with code? No stress. Just message me on FB, I can help you tweak things.
Basic Setup
Alright, before you make any changes, let’s set up the basics.
These steps apply to every template (even if the design looks different).
- Open Your Page in the GHL Builder
Go to your funnel or website page inside GoHighLevel, and open it in the Builder view. - Go to Custom CSS Tab
On the top left side menu bar, click on “Custom CSS”. This is where all the custom styling lives for the page, and where you’ll edit your brand colors, spacing, fonts, etc, that I used for styling - Find the
:rootBlock at the Top
Right at the top (usually line 1), you’ll see a block that starts with like this 👇
CSS
:root {
  --px-action: #5d47f0; /* Purple (CTA Color) */
  --px-primary: #ffd86f; /* Warm Yellow */
  --px-secondary: #c9ff85; /* Lime Green */
  --px-accent: #9886fe;  /* Soft Purple */
  ...
  ...
}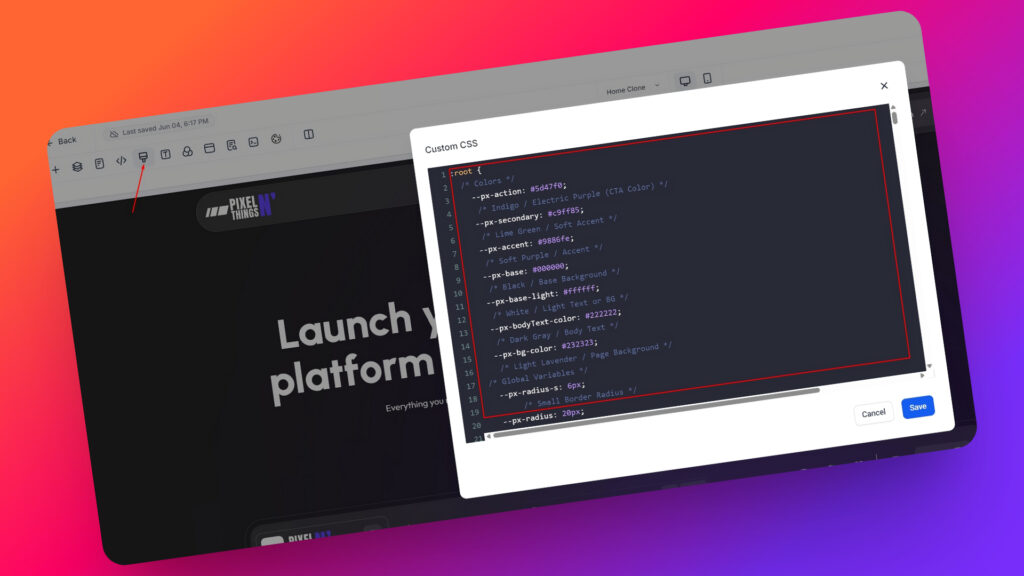
This section controls all the main colors on the page. These are called CSS variables (or tokens).
Instead of searching through long CSS files, you can just change these values here to quickly update the colors, spacing, and layout across the entire page.
In this build (screenshot), my action color is a purple shade (#5d47f0). If your brand color is different, let’s say orange or green, just replace the hex value like this:
CSS
:root {
  --px-action: orange;
  /* or */
  --px-action: #FFA500;
}
You can do the same for other colors like --px-primary, --px-secondary, and --px-accent
In my screenshot, I’m using four colors. But you don’t have to use them all.
If your design only uses two main brand colors, there’s no need to keep all the extra tokens like --px-secondary or --px-accent. You can safely delete them and just keep the ones you’re actually using, like:
CSS
:root {
  –-px-action: #FEB47B;
  –-px-primary: #9CC482;
}
Now here’s the important part, don’t hardcode your colors all over the page like this:
CSS
❌ background-color: orange;
❌ background-color: #FEB47B;
Instead, always use your token like this; it’s better to define it in the root:
CSS
✅ background-color: var(--px-action);That way, when you change the value in the :root, it automatically updates everywhere that uses --px-action. It saves time. Keeps things consistent.
Bonus Tip
Yes, you can rename the tokens if you want, for example:
CSS
:root{
   --my-brand-color: #F04A4A;
   --main-spacing: 2rem;
}
But just a heads-up…
⚠️ If you decide to rename any tokens, you’ll also need to update the same token names everywhere in the CSS.
Otherwise… it won’t work. Not comfortable editing CSS? No worries, just leave the token names as they are. They’re already set up to be easy to manage.
Naming Tokens
Tokens or Variables are just little shortcuts for things like colors, spacing, height, padding or font sizes etc.
Instead of writing the same color or size over and over, you write it once at the top, and use the token name everywhere else. Example:
CSS
:root{
   --my-font-size: 16px;
   --my-spacing: 20px;
}
Then in your styles, for you GHL element. You write like this;
CSS
#yourbuttonid{
   font-size: var(--my-font-size);
   margin: var(--my-spacing);
}
It makes your design so much cleaner and easier to update. You can also include your branding in the token name to keep things organized. Like I did:
--px-action, where px stands for PixelNThings. This keeps your tokens clean, easy to remember, brand-specific, and won’t conflict with GHL styles.
This method gives you full control over your brand’s color scheme. So if you ever want to change your orange action color to something else, just update the token value, and it’ll reflect everywhere instantly. No need to hunt through the full CSS manually.
Color
Now that you know how the tokens work in the CSS, let’s see how to change colors inside the GHL builder itself.
Instead of creating a new color every time, it’s better to edit the existing ones I’ve already added in the builder.
That way, if any element on the page is using that color, like a button, icon, or background, it will automatically update everywhere when you change it. No need to manually update every single block.
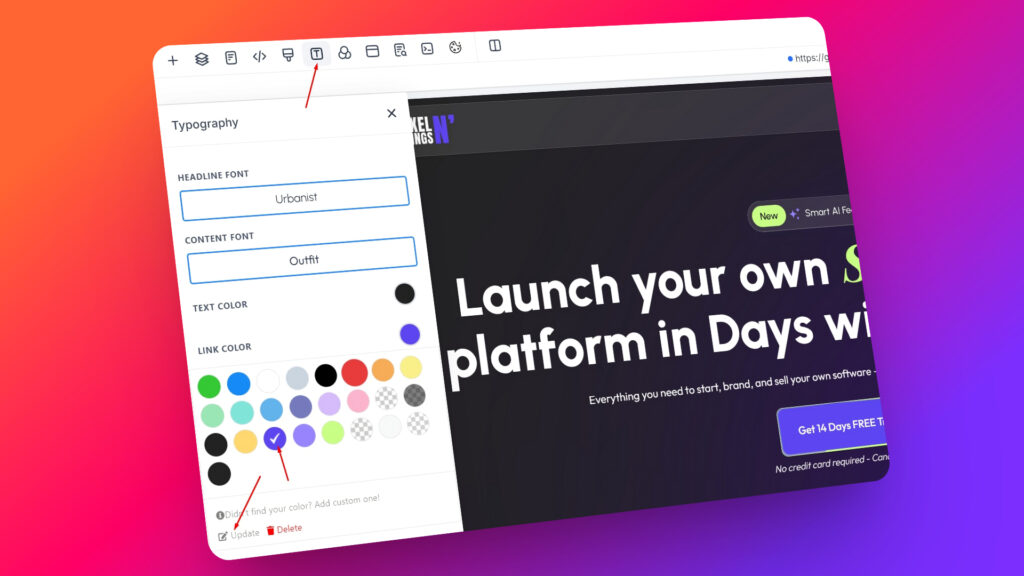
Just click on the color swatch, select “Update,” and change the HEX code to your brand color.
For example, if you want to change the action purple #5d47f0 to a different shade, update it once, and it reflects across the whole page instantly.
This saves time and keeps your styling consistent.
Now that you understand how the layout works, how to tweak colors with tokens, and how to update styles globally, you’re ready to start editing.
Limitation of GHL
Sometimes, when you’re editing your page inside the GoHighLevel builder, things might look broken, even when they’re not.
You might see:
- Sections not stacking properly on mobile
- Weird spacing on desktop
- Images out of place
- Animations not working
- Some styles not showing up at all
But don’t worry, your template isn’t actually broken. This happens because the GHL builder has some limitations:
- It doesn’t fully support custom CSS inside the editor
- Media queries (used for mobile styling) don’t apply properly while building
- Some styles only show up when the page is live or in preview mode
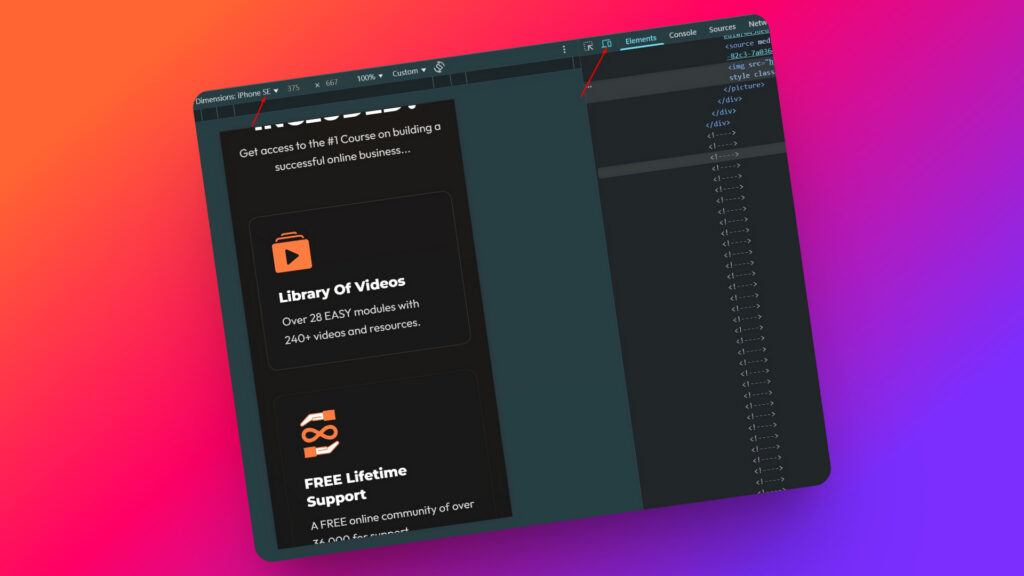
How to See What It Really Looks Like
To get an accurate view of your layout:
- Click the “Preview” (eye icon) button inside the builder on top right
- Or open the page on your actual phone
- Or right-click when preview → Inspect → click the mobile icon to simulate screen sizes
So if something looks weird while editing, don’t stress. Check it in preview mode first before making changes. The custom CSS will kick in properly once the page is live.
That’s It — You’re All Set!
You now understand:
- How the layout is built
- Where to edit your brand colors using CSS tokens
- How to update styles inside the GHL builder
- Why things sometimes look off (and how to preview them properly)
Whether you bought a funnel, website, or mini link-in-bio page, this setup works the same across all my GoHighLevel templates.
I’ve done the hard part, designing it to be clean, modern, and easy to customize.
All you need to do now is:
👉 Update your colors
👉 Replace the content
👉 Preview the design (don’t trust the builder blindly)
👉 Publish when ready
Need Help?
If anything feels confusing or you just want me to do it for you, message me on Facebook and I’ll help you tweak it.
You’ll save hours… and your page will still look 🔥
Thanks again for grabbing the template. You’re gonna love what you build with it!